CA/AL challenge - first time for me - and they came up with a doozie -
Here is the challenge with Nancy's twist:
Pat suggested we do a furniture theme and that sounds great - plus I think we should do the following:
*has to have some hardware (doesn't all furniture have that?)
*has to have something on it/in it that represents something we collect, cherish - you know something what we would display on/in our furniture at home
*something with dust (like dust on the furniture, comments about dust, something you clean dust up with, a dust bunny, etc)
Well, I didn't have any furniture stamps, but thinking about furniture reminded me of a bookcase my DH made for me - but how to make that a card? - not happening!! - then a link was passed around by Pat to tease us, from wenchie aka Heather in Canada, which led me to check out some tutorials on her site, see her blog here: http://www.paper-castle.com/
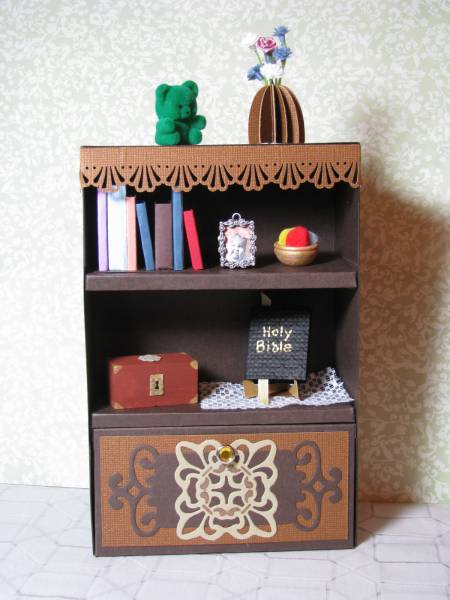
- how to make a box, how she scored CS to make furniture, and boxes, finishing touches, and a WHOLE LOT MORE!!! She is talented beyond belief!! Hmmm, very interesting, could I do it?? PMed Heather and asked some questions, and she assured me if I could make a shadowbox of my DH's workshop, filled with wood items, I could really do this! Took my time and followed the basics Heather set down for making corners, finishing edges so it would not sag, etc. Finished off the top shelf with a strip of MS punched scalloped border. The main piece was made from an 8 1/2 x 11 pc of CS, scored at 2 inches all the way around. The finished bookcase stands 7 inches tall, 4 inches wide and 2 inches deep.
Filled the shelves with books I made from pieces of wood, covered with cardstock - the Bible has an embossed cover, and is mounted on a book stand, the Memento box is 2 blocks of wood, glued together, painted, and gold tipped on the corners, with embossed gold pieces for the seal on the top and the key panel in the front. There is also a bowl, painted gold holding "yarn", and the "vase" is made by punching out 9 ovals and cutting off the bottoms, scoring them down the middle, and gluing them together, side to side, and adding tiny flowers to form the vase. I bought the little metal picture frame and the green bear. Oh, and it is sure to gather some dust, just like any other piece of furniture, LOL!!!
Hope you like how it turned out - but what a challenge! - really made me reach beyond anything I had ever done before with cardstock!! Thanks, Nancy and Pat, I loved doing this!! and thanks to Heather for so graciously sharing all her tips on construction!! HUGS!!!
Date: Sunday, August 7, 2011 GMT Views: 2279
Favorited:22
Registered: January 2, 2013 Location: Burlington NC Posts: 1861
Sat, Jan 24, 2015 @ 10:31 AM
HOLY COW!!!!! This is FANTASTIC!!! SUE! You have GOT to come visit! Grab Nancy and let's 3D ourselves til we can't get out of my craft room!!!! This is spectacular!
------------------------------ Carmen
Slightly Manic, Full-On ADHD and currently stalked by my OCD
I am a:
Proud Fan Club Member
PROUD Splitcoast Dirty Dozen Alumni
And because everybody else has one and I HATE being left out, here's my blog papercraftgoddess.com