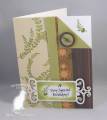
Measurements: yellow – 3 ¼ x 3 ¾” plus 1/16 and 1/8” borders, image panel – 2 3/8 x 3 5/8” plus 1/16 and 1/8” borders, punched cross panel – 1 ¼” x card width
-For the Cuttlebug negative effect embossing technique which was done on the yellow layer- click here.
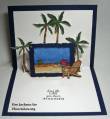
-Using watercolor crayons* I did a watercolor wash (SCS technique link) with yellow and covered the watercolor paper stopping the run just beyond the brown; this was done with a ½” flat brush. I then streaked rose red using using a fan brush. Using the flat brush for the ground area I added green then brown over the green keeping it thinner at the top. Now you let it dry or speed up the drying process with the heat tool.
To create the wash with crayons: wet the flat brush and rub it across the crayon letting it drip into the section of the paint palette or small dish.
I thought the wash seemed a little thicker than using ink for the color and it gave me nice results when I streaked with the fan brush. ItÂ’s also great to have a new technique for those lonely crayons!
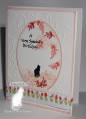
-Prismacolor pencils, baby oil and paper stumps were used to color the flower images using the Gamsol technique found in the resources section here at SCS. Baby oil replaces the Gamsol.
The flowers are a partial image, I stamped the entire image for the card front and cut out what I wanted to use. For the inside of the card I colored the rubber with a black marker then stamped and for this step I used the stamp positioner in case it requires stamping again. The baby oil did not smear the marker ink.
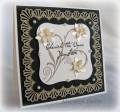
-The card front flowers and butterfly are paper sculpted using a metal ball stylus and a folded paper towel for cushion. First score lines on the front then turn the image over and make circular motions with the stylus staying away the edges and score lines.
-While cutting the butterfly out I carefully and successfully cut the head and antennae out but it detached from the body so I put it aside but when I was ready to glue it to the body I couldnÂ’t find it and realized I accidently glued it to the underside of the bodyÂ…so I did a quick fix using wire and Diamond Glaze and colored the glaze black with a Sharpie marker. Another mistake salvaged!
-The orange strip on the border punch panel is a 1/8” strip glued to the card.
-The flowers are popped up with foam tape.
-Ink distressing was done on the yellow and rust panels and also on the inside panels. I used the Ranger/Tim Holtz sponge and applicatorÂ…I like it but I need to work on the technique which is a bit a different to me than using my sponges.
-The out of the box feature for the inside flowers is very easy by cutting to the image with the regular paper cutter on the front, marking the image on the back while holding to a light source then use the paper cutter again to cut to that mark. Scissor cut the image out. My paper cutter is a guillotine style. I used a Coluzzle and craft knife to cut between the images.
Tools: Cuttlebug and embossing folder, Martha Stewart border punch,
Stampin Up mat pack, Bazzill piercer for brads, metal ball stylus, artist brushes, stamp positioner, paper stumps, Coluzzle and craft knife, sponge and applicator
Date: Tuesday, April 13, 2010 GMT Views: 2936
Favorited:18
Accessories: Black and green markers, Forever in Time – brads, Prismacolor pencils, baby oil, Stampin Up – water color crayons, wire, Diamond Glaze, Sharpie marker
Techniques: Prismacolor, paper sculpting, dry embossing, ink distressing, out of the box, water color wash
Registered: March 11, 2008 Location: Sacramento, California Posts: 39766
Wed, Apr 14, 2010 @ 2:44 PM
Soooo many steps with stunning results! I love this Rox. Wonderful job. Going to have to check out a few of those techniques you used. Thanks for the new ideas. Love your card. TFS :0)
------------------------------ Cathy B aka: Mutnik ....or is it Nutmeg?! I get so confused!
Smile.......people will wonder what you are up to! :0) Proud Fan Club Member 2010 DT forRubbernecker Stamps My Gallery