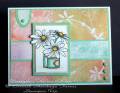
Daisy panel before borders: 1 5/8” x 2 ½”, designer paper is cut ¼” smaller than the 4 ¼” x 5 ½” card size, the pinkish side is 2 3/16” wide
-Prismacolor pencil and mineral spirits is used for the image.
-I stamped the Itty Bitty Backgrounds along the edge of the designer paper, nothing more was done so the sponged look is just part of the paper. The paper was a great find; 25 sheets of 12 x 12” for one dollar.
-Cutting out of the box works best for me by holding the image up to a light source and marking the image spot you wish to cut to on the back. Cut to the image with your paper cutter on the front side, flip it over to the back and cut to the mark previously made then cut around the image with scissors. Although I didnÂ’t do this on this panel - any straight cuts between images works well with the Coluzzle knife/tool and any straight cut template.
-Paper piercing was done with Stampin UpÂ’s mat pack.
-The cross stitch was done with thread and needle after the holes were pierced.
-The image panel set up on foam squares.
Registered: September 12, 2007 Location: Wake Forest, NC Posts: 61357
Wed, Apr 16, 2008 @ 11:04 AM
Oh, Rox, arent you just lovin' this challenge? I see it didnt take you too long to pull out those gorgeous dps! The papers you selected are extraordinary! And that stamped image is creatively colored ever so well. Love those flowers! Love this card. Very fun challenge, wouldnt you agree?
------------------------------
Art Neko and Prickley Pear DTs
Former DT Dolce Designs, Rubbernecker, StampItCrazy,
I Brake For Stamps
DO U KNOW?
BRAK members love to send SCSers cards on their birthdays? Come join us.
"Do not go where the path may lead; go instead where there
is no path and leave a trail." ... Ralph Waldo Emerson