Measurements: Image panel – 2 5/8 x 4 3/8” plus 1/16” border, Designer paper – 3 3/8 x 4 7/8” plus 1/16” border, the sentiment is a pre cut piece that came with the designer paper and it is approx 1 7/8” across the hello area x ¾”
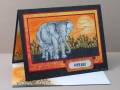
-Stamp the elephant and mask off; I used post it notes for the mask and will store it to use again. Stamp on the tall grass. Using a torn piece of paper mask off the sky area and sponge on the ground color. Stamp on the short grass.
-Now switch to the other piece of torn paper and mask off the ground area.
-For the sun I punched 3 sizes of circles (1/2”, 1” and 1 ¼”) and layered them on top of each other. With the last step of sponging I removed one at a time as I continued to sponge and got three depths of color.
-Now back to the sky sponging, I started sponging at the bottom with the lightest color, medium in the middle and darkest at the top.
-For the streaks in the sky I used a post it notes. The streak lines were cut out of the paper. In all it took about five minutes for this step, just a few streaks will do because you can move in different locations on the panel.
-The elephants and tall grass were colored with Prismacolor pencils, baby oil and paper stumps. Any areas that showed a bit of white after removing the mask were touched up with the pencils.
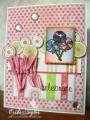
-My faux brads were cut with the small tags die from Cuttlebug and glued to the card. I like the die because it rounds the edges and you would not know they arenÂ’t real especially with this extra thick cardstock.
Tools: ½”, 1”, 1 ¼” circle punches, Cuttlebug tag die, sponge, scrap paper, post it notes, paper stumps
Date: Tuesday, March 9, 2010 GMT Views: 2054
Favorited:19
Your card is the superlative after fabulous! I have this stamp and I've used it a few times, but never dreamed it could look like this. Thanks also for the clear and specific instructions. I love this hobby and the people who make it so fun.