A2 measurements are:
Layer 1: (base) 11” x 4¼” with rounded corners
Layer 2 & 3: (layer 2 for image) 5 ½” x 2 ½” (layer 3) add a 5 ½” x ¼” or less, torn edge or punched border
Layer 4: (for sentiment) 2 ¼” x 1 ½” with rounded corners
Layer 5: (circle) add a button, brad or bow
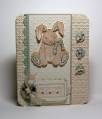
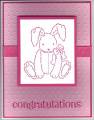
To create my base (layer 1) I used Very Vanilla cs, rounded the corners and stamped it with SUÂ’s Linen bg stamp in Kraft and ran it through the BS with the Square Lattice EF. MS border punch used for the green border (layer 2). Swiss dot dp used for (layer 3) and Very Vanilla layered on top embossed with a polka dot EF. I stamped my bunny from SUÂ’s A New Little Someone on Very Vanilla; water colored in Kraft and cut out dp for feet, ears and bow. Image was cut out and attached with dimensionals. DP used for (layer 4) layered with Very Vanilla and stamped with sentiment from SUÂ’s For A Friend. I made the buttons using Sizzlits Button #5, covered with coordinating dp and adhered with mini glue dots. I tied beading thread on the smaller buttons and frayed it. All dp used is from the DCWV matstack Linen Closet. Very Vanilla seam binding used for my bow with a safety pin from Vintage Trinkets.
Date: Tuesday, July 5, 2011 GMT Views: 7215
Favorited:82
Just imagining how you got to put all of these together is hard enough for me. The result is amazing to say the least. Is there a section on this community where we can see step-by-step images of everyone's creations?