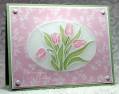
I stamped the tulip image in the center of a piece of 5 1/2 x 4 1/4 cardstock vellum with Pallette New Canvas. I turned it over onto an embossing mat, rubbed the back of the image with wax paper (reduces the risk of tearing) and then gently traced the lines with the embossing stylus. I first traced using the larger end of the stylus, and then re-traced with the smaller end. This gradually stretches the vellum and reduces tearing. The smaller end of the stylus also turns the vellum whiter.
I then colored the back of the image with SU! markers - Pretty in Pink, Certainly Celery and Old Olive. A blender pen was used for shading and removing color if necessary. It helps to keep checking the front of the image to see the results you are getting.
The tulip image was stamped again in the center of a piece of Pretty in Pink cardstock with White Craft ink and heat embossed with white detail EP (the oval is part of the stamp image). I cut away the image following the lines of the oval, creating a window. I then stamped the Climbing Leaves background with White Craft ink and heat embossed with white detail EP.
I mounted the colored vellum image over the pink layer, lining up the ovals. I adhered the vellum and pink layers together with a vellum adhesive runner. I trimmed the piece to 5 1/8 x 3 7/8, then mounted them over a 5 1/4 x 4 panel of Shimmery White cardstock and added the brads. The brads were originally matte white, which I heat embossed with White Pearls EP. Finally, the pergamano piece was mounted onto a card base of Bazzil soft green.
It's unfortunate that photos and scans cannot do justice to the softly dimensional, lovely effect of this technique.
Date: Thursday, February 28, 2008 GMT Views: 4265
Favorited:87
Registered: July 18, 2005 Location: No matter where you go--there you are! Posts: 2963
Sun, Mar 02, 2008 @ 2:26 PM
If you don't think the photo does this card justice, I can't imagine how incredibly beautiful in must be in person. It is SO soft, and SO pretty. It was worth all that work.
Registered: October 25, 2004 Location: Southern Oregon Coast Posts: 17641
Sun, Mar 02, 2008 @ 10:31 PM
Here's another one of those techniques you do so flawlessly...a gorgeous, gorgeous card, Linda. I know the photograph doesn't do it justice but, oh my, it does look beautiful, anyway! The time involved in every detail you've described was well worth this outcome. Thank you so much for sharing the instructions and inspiring us all!
Registered: April 21, 2007 Location: Mesa, Arizona Posts: 24458
Mon, Mar 03, 2008 @ 10:53 PM
I know what you mean by the picture not doing this justice. I got a card from my friend Kathie McGuire using this same technique so I know how truly beautiful it is. I can just tell that IRL this card is a knock out. It's gorgeous here but your right, the dimension which is the prettiest part of this technique, is lost. Oh how I would love to see this IRL because I know how truly beautiful this card really is. Believe me everyone,it's very special....
Registered: August 9, 2005 Location: Tampa, FL Posts: 16812
Fri, Mar 07, 2008 @ 7:50 PM
Linda this is so incredibly beautiful! This technique reminds me of the technique I used to make the vellum butterflies in my gallery. I'm going to try this as well!
------------------------------ Jerri Kay My Gallery My Blog - A Touch of Grace Shout to the Lord, all the earth let us sing, power and majesty, praise to the King!