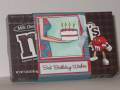
Measurements: lavender panel is 3 ½” and the length of the card. Image panel before border is 1 7/16 x 2 ¾”, sentiment panel before border 3 x 7/8”.
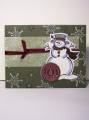
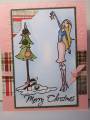
This is going out to a friend who has a fondness for lighthouses.
Images came from Cornish Heritage Farms. -Image scene is water colored with re inkers and artist brush.
-Sun is mask off by punching a circle from a post it. No color was added to the sun.
-I masked off the lighthouse and grounds area with a post it and sponged on the sky.
-Direct to paper/DTP is done on the two light blue edges that touch the lavender.
-I did my less bulk faux brads on the sentiment panel.
1. Punch four 1/8” circles
2. Put a very tiny touch of glue on paper and lay a punch out on it until you have the four secured. I am talking next to nothing for glue!
3. With a VersaMark or embossing pen ink up only the very top (not down the sides or itÂ’ll stick to the paper).
4. Cover with clear embossing powder and heat. I did two coats.
5. Pull the circle off the paper.
6. Use a straight pen and touch it in glue then touch the faux brad back and place on the card. This can all be done in a couple minutes.
-To avoid giving the scene a stretched out look when setting up the panels follow these steps:
1. Create the scene and color.
2. Determine the panel sizes and make two cuts. You now have 3 pieces all the same size.
3. Determine how much has to be cut off the panel to create the space and cut the same amount off each panel. For example – if I cut off only one panel then stretch the distance my sun would be out of shape, as it is now I can lay the post over it and it will match up perfectly on both panels. The same goes for the flow of the landscape hill.
I so often see landscape or for example a butterfly paneled and itÂ’s all pulled out of shape because they didnÂ’t cut from both panels.
I hope you got that little lessonÂ…itÂ’s easier to show it than put it into words!
The sponge: my SIL brought me some packing sponge from the heating a cooling place she works at. It is very soft and it worked better than purchased craft sponge and the price is perfect - free! I cut a four inch square and bring all four corners together so you have a nice ball shape hitting the paper. For problem fingers this is easy to hold too.
She also brought some that is very coarse and it works great for sponging in a ground area.
So test them out before you throw them out!
Date: Tuesday, January 22, 2008 GMT Views: 5156
Favorited:27
Stamps: Cornish Heritage Farms/CHF – Birthday Wishes, Canvas Backgrounder, Palm Trees, Yaquina Head, OR (you didn’t know Oregon had palm trees did you!
Paper: Semi glossy and flat white, Stampin Up – Night of Navy, Neenah – blue linen, The Paper Company – lavender
Ink: StazOn – Jet Black, Stampin Up re inkers – Garden Green, Always Artichoke, Creamy Caramel, Going Gray, Basic Gray, pad ink – Almost Amethyst, Bliss Blue, Cool Caribbean, Night of Navy
Accessories: 1/8” punch, clear embossing powder, heat tool, sponge, post it, artist brush, water, foam squares, tape, tacky glue
Registered: June 26, 2006 Location: North Idaho Posts: 4297
Tue, Jan 22, 2008 @ 10:16 PM
Lovely card! Thanks for explaining how you cut the panels. When the panels are stretched out as you described, it can ruin a whole card, imo. I noticed that your landscape and sun lined up before I read that you took the steps to make sure it was right.
I like your faux brads. I have made them before when I didn't have a color I needed. Thanks for the reminder!
------------------------------ Alice
[COLOR="DeepSkyBlue"]>^..^
Registered: September 7, 2006 Location: Northern Nevada Posts: 33121
Tue, Jan 22, 2008 @ 10:38 PM
This card is awesome! Thanks for the info for cutting those panels so as not to stretch the scene!!! You always go a step further with your descriptions, and I appreciate that!!!
------------------------------ Happy Stamping! CarrollAnn
Fan Club Member