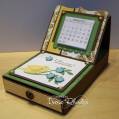
Congrats Vicki aka Vdutchr for being chosen this weeks Featured Stamper. What a fabulous gallery with so many great cards and projects to chose from . So at about 630am I started strolling through her gallery looking for something to case, I came across this Desk Stationary and knew right away I wanted to try to make one. I thought I could use one of these, but wanted mine big enough to fit a pen so I can have it handy next to the phone for messages, hopefully from the Realtor telling me the house is sold, lol The box drawer is 4x6 inches
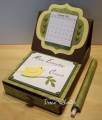
I originally wanted to put the pen inside the drawer, then thought of a little holder to attach it to the outside of the box, but I wasn't' sure I would like it and I ran out of 1/4 inch red sticky tape so left it off for now.
No stamping on this one today, the sentiment is computer generated. Calendar was made using Printmaster and glued together with padding compound. It makes it easy to tear off each month as needed. Love this stuff, I bought it several years ago along with a metal press to make notepads and such.
ok, I'm going to do my best and give you the direction to my box.
The box is a 8 x11 piece of cs
long side score at 1,2,6,& 7 inches
short side score at 1 & 7 inches.
I like the front where the drawer slides in and out to be doubled. I cut out the score lines for this so it will lay flat and not be bulky. I also cut the score lines out of all my flaps so it doesn't get bulky either. Where the 1 and 2 inch score lines are on the long side, cut each little corner out ( the one inch square )
cut your flap at an angle, and attach to other side of the long end. adhere front flaps to inside on front , by tucking them inside, this gives you a double edge. Then fold up back flap to close the back of the box and adhere.
The drawer is made like the Nugget box bottom . Steps 1-3. I used a piece of cs 7 3/8 inch by 9 1/2 inches.
I scored all four sides at 7/8 and 1 3/4 inches. Cut each corner L out and assembled like the nugget box
The top has a piece of dp 4x6 inches, I did trim that piece a little to fit. The easel part is a piece of cs 4 x 8. I used a border punch on the end, then scored it at 3 , 3 1/2, & 6 inches. The last (less than) 2 inches tuck under the top piece of dp to form the easel part.
Decorate as you wish
I hope this makes sense, any questions please feel free to ask.
Thanks for looking
Date: Sunday, August 8, 2010 GMT Views: 7611
Favorited:72
Registered: June 4, 2009 Location: Deatsville, Alabama Posts: 83416
Sun, Aug 08, 2010 @ 7:20 PM
This is so great - so useful and so beautiful! Great job and I hope you get that awaited message soon!
------------------------------ Nancy Williams - Hope your day is Spirit-filled and ink-filled (in that order)!DRS Designs-DT, Punchkateerforever, Dirty Dozen Alumni
Registered: April 3, 2007 Location: In a state of oblivion.... Posts: 14120
Sun, Aug 08, 2010 @ 11:13 PM
Beautiful work!!! Great little calendar! Good luck with the house selling thing - that can be so stressful. I have about 6 cards from your gallery in my faves to try and choose for a QFTD card - congrats on that honour. Hope to get one done soon - summer has not allowed as much cardmaking as I think it should have! Enjoy your stay in the castle.
------------------------------ Heather ...... My Gallery You cannot do a kindness too soon, for you never know how soon it will be too late." Ralph Waldo Emerson Founding Member of the Punchkateerz - "You don't have to be crazy to be one of us, but it sure helps."
Registered: December 15, 2008 Location: Ontario, Canada Posts: 5806
Tue, Aug 10, 2010 @ 9:46 AM
wow!! irene, you've outdone yourself!! this is so stunning! into my faves, although since it took me so long to actually make an easel card, who knows how long it'll take for me to attempt this. thanks for providing the details.