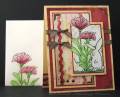
I chose this photo to play from, I saw the red flower and started searching for paper and came up with this DaisyDÂ’s coordinating pieces.
-Prismacolor pencils, baby oil and paper stumps for coloring the image.
-The ribbon is tied first then one end taped under the image panel, wrapped around the inside of the card and taped to again where I taped the first end.
-Iron eagle punch was used for the corner features.
- Sponging was done with a sea sponge on the yellow and image panel to coordinate with the designer paper.
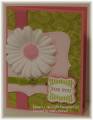
-Image is mounted on foam tape.
-My out of the box images are cut this way: I hold the image panel to a light source and make a mark on the backside to show the image location which will be in my line of cutting. I cut to the image on the front with my paper cutter, flip it over and cut to the mark on the back then cut out the image with scissors. I have a guillotine style cutter.
When cutting between images such as the bunny ears and tail, I use a straight line Coluzzle template and craft knife.
Tip on coloring the envelope: If it's a ready made envelope it's best to put a piece of cardstock inside before coloring to keep the surface smooth.
If you make your own envelope a piece of double sided tape that needs the backing peeled off will be great if your giving as a gift to use at a later date. If I'm mailing it, I just glue it shut!