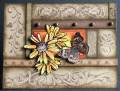
What you see is one panel with sections masked off and ink distressed after the image was stamped; the narrow strips and center are attached to that card base after they were stamped and ink distressed. The center piece is one layer of only orange that is also ink distressed then a top layer of glossy cardstock sponged with varies colors starting with the yellow and working outward; I also ran the black marker along the edge to give it definition from the under layer. The images are colored with re inkers and pad ink using a small artist brush. The two lower flowers and butterfly are glued to the card; the top flower is attached with sticky foam.
I always go around the edge of the images with black marker if they are stamped in black to hide those raw edges. Use the marker so the image is facing away from it just in case it slips - which it always does and no harm done!
Date: Thursday, May 17, 2007 GMT Views: 1517
Favorited:26
Additional Info
Stamps: Stampin Up - Petal Prints and assorted retired images from Etruscan, Background & Borders, Cornish Heritage Farms - Butterfly, Birthday plate 1 border
Paper: Glossy, Stampin Up shades of tan and brown, only orange cardstock
Ink: Stampin Up classic Basic Brown, Marigold Morning, Summer Sun, Only Orange, Rose Red, Close to Cocoa, Creamy Caramel, Brilliance Cosmic Copper, Lighting Black, StazOn Jet Black
Accessories: Artist brush, cutting scissors, sponge, sticky foam, double sided tape, tacky glue, brads, stamp positioner, black marker
Registered: March 15, 2005 Location: Iowa Posts: 7287
Fri, May 18, 2007 @ 5:39 AM
Gorgeous card, very artsy, love it, the center area really pops,,, tfs
------------------------------ Sherlie..... aka Surelyyoustalktoo? Just living is not enough, one must have sunshine, freedom, and a little flower,and a few stamps, of course, www.splitcoaststampers.com/go/Sherlie