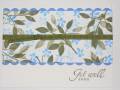
I used colors, images and layoutÂ…just about cased that photo!
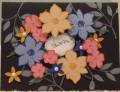
The flowers are done with this procedure: first apply VersaMark to the image and before stamping apply dye ink, stamp, then clear heat emboss. The leaves were done with a marker.
Second step is to do polished stone over the entire panel keeping the top corner lighter so hit that area last when the ink is running out. I then buffed with a paper towel - the buffing helps take ink off of the embossing powder.
Third step is to add shading interest by doing the polished stone technique but I only used one color of brown and went down the left side and top right corner and buffed.
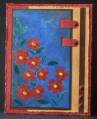
The gems are held on with Diamond Glaze. The light panel is sponged with tea dye distressing ink. Word Window and Slot punches are used for tabs and circle punch under the brads on the brown strip. Tool distressed the edges - someone may have to take that tool away from meÂ…I love this distressing!
Date: Saturday, January 27, 2007 GMT Views: 779
Favorited:13
Paper: Semi glossy white cardstock, heavy brown textured paper by Canson, Stampin Up – cranberry and saffron cardstock
Ink: Stampin Up classic – Cranberry Crisp, Brilliant Blue, Bliss Blue, Close to Cocoa, VersaMark, Ranger/Tim Holtz tea dye distressing ink
Accessories: Forest Foliage marker, gems, Word Window, Slot and ¼” circle punches, brads, sponge, Tonic perforator tool for distressing, VersaMark pen for leaves, clear embossing powder, block, felt, velcro for polished stone techique tool
Registered: March 9, 2005 Location: OH Posts: 28555
Sat, Jan 27, 2007 @ 9:38 PM
So very pretty.
------------------------------ My Blog- Trusting in the Lord for Everything Proverbs 3:5-6 Trust in the Lord with all your heart and lean not on your own understanding. In all your ways acknowledge Him and He will make your path straight. My Stampin' Up WebsiteMy Gallery, BRAK New Member Mentor. New Grandmother to Mia Lou. 1st Grandchild.