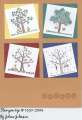
I first made a mortise mask of my hand-drawn tie, then stamped the four seasons images using the mortise mask and my Stamp-a-ma-jig. The images were colored with Twinklin H2O's, watercolor pencils and glitter gel pens (for highlighting). Snow was made with Tulip Puffy Paint.
Date: Monday, October 18, 2004 GMT Views: 4177
Favorited:73
Awesome Creation! It is beautiful... My Dad loves Ties he woukd enjoy a card like this, or even a Tie that is stamped like this. What is a mortie mask? That is a new one to me.
Registered: September 11, 2004 Location: Brentwood, TN Posts: 7647
Tue, Oct 19, 2004 @ 7:43 AM
Thanks for your nice comments, guys - I had alota fun with this one. For those who asked: a mortise is a reverse mask, which is how you can neatly place images inside of something (like a jar, or in this case, the ties). Think stencil! To make a mortise mask, first stamp (or draw) the image onto thin paper (I used a transparency). Very carefully, cut out the inside, leaving the outside "frame" around the image intact. I did this by first poking a hole in the middle of the image so I could get my micro scissors in, without having to cut through the frame). Now you have a stencil! For the ties, I used my newly created stencil to trace the outlines of the ties onto the cardfront. Next, place the mortise mask over the drawn/stamped image on the cardfront so that the "hole" of the mask is perfectly alligned with the area you want to stamp on, and go ahead and stamp. (The mortise protects the surrounding area from getting stamped.) I used my Stamp-a-ma-jig to get the trees centered perfectly on the ties. One other note - it works best if you cut the mortise mask slightly (but ONLY slightly)larger than the image, to avoid halos. Have fun!!!!
------------------------------ Linda
”From the rising of the sun to its setting,the name of the Lord is to be praised!”