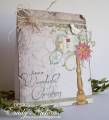
Today's IC takes us to French Garden House. What gorgeous, vintage finds to drool over on this site! I was inspired by the overall vintage feel and this lovely, glass, mercury bird: http://www.frenchgardenhouse.com/catalog.php?item=2023
I used stamps, dies and patterned paper from Heartfelt Creations for this card. You can find the product list and instructions on remaking this card below.
HCPC 3490-Holiday Mail PreCut Set
HCPC 3488-Decorative Metal Fixtures PreCut Set
HCPC 3493-Yuletide Sentiments PreCut Set
HCD 725-Decorative Metal Fixtures die set
HCDP1 225-Frosty Blanket paper collection
other supplies: white card stock, watercolor paper, glitter, glossy accents, ivory burlap string by May Arts, Martha Stewart border punch, Black Staz-On ink, Antique Linen and Walnut Stain distress inks, kraft knife, blender pens (SU), tiny yellow gems
Fold white card base so it measures 4.25" x 5.5". Ink edges with distress ink. Cut 5.5" x 4.25" panel from Frosty Blanket paper. Distress edges with scissors and by ripping in places. Ink edges with distress ink and adhere to front of card base. Stamp sentiment in lower left corner in black ink. Stamp mailbox image and decorative post in black Staz-on ink onto water color paper. Color with various inks and a blender pen. Use coordinating die to cut post and free hand cut the bird and mailbox image. You will need a kraft knife to get into the tiny spaces. Use MS border punch to create border for top of card. I used the left over strip from punching that for a border at the bottom. Before adhering, cover with glossy accents and sprinkle with glitter. After they have dried, adhere to the bottom and top of card. Next, add glossy accents and glitter to foilage on mailbox. I also added tiny, yellow rhinestones to the center of poinsettia. When dry, adhere post and mailbox image to right of card base. Some of the poinsettia and foilage will go off of the card. Tie ivory, burlap string around decorative border at top and add a glittered button to the middle. I added the glitter using glossy accents. I also added some glitter to the main panel in places on the designer paper.
TFL!
Date: Saturday, September 8, 2012 GMT Views: 1996
Favorited:7
Registered: July 12, 2005 Location: Hugging a golden and stamping' in PA Posts: 21216
Sat, Sep 08, 2012 @ 11:07 AM
What a gorgeous vintage Christmas card, Emily! I agree...this wonderful site is filled with lots of vintage inspiration and your card perfectly reflects that!
Registered: March 9, 2005 Location: OH Posts: 28554
Sat, Sep 08, 2012 @ 11:13 AM
Emily, what a beautiful card with all of the elements you've included.
------------------------------ My Blog- Trusting in the Lord for Everything Proverbs 3:5-6 Trust in the Lord with all your heart and lean not on your own understanding. In all your ways acknowledge Him and He will make your path straight. My Stampin' Up WebsiteMy Gallery, BRAK New Member Mentor. New Grandmother to Mia Lou. 1st Grandchild.
Registered: April 21, 2012 Location: North Texas Posts: 1055
Sat, Sep 08, 2012 @ 1:53 PM
STUNNING card! Your attention to detail is exquisite. Going in the faves folder! Absolutely love the color scheme and your coloring of the images. Love the many layers and textures and how you distressed the edges of the first layer. Absolutely stunning card!
------------------------------ Shea Fan Club Member Glitter and Bonbons When all else fails....have a cupcake.
Registered: September 19, 2010 Location: Tacoma, Washington Posts: 8979
Sat, Sep 08, 2012 @ 3:33 PM
So beautiful!!
------------------------------ God Bless!
DJ Rants Give thanks to the Lord for He is good, His love endures forever. 1 Chronicles 16:34 http://www.djs-creations.blogspot.com/