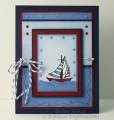
All layers were ink distressed with water based ink.
The stars were cut with the Cuttlebug die Snowflakes and I use a stick pin as my tool and touch it to glue then to the back of the star and itÂ’ll pick it up. I then placed it on the card and press down with the finger as I pull away and then slide it into place if needed.
Same procedure was used to attach the faux brads on the light panel. Those were cut with the Cuttlebug Tiny Tags die and then covered with AleeneÂ’s Paper Glaze to give it that shiny finish.
And for both these shapes I punch ¼” circles of cardstock and place that over the die shape for cutting to save from having a bunch of extra shapes you may never use.
The light panel going across the card was embossed using the Fiskars Ocean plate. I run it through the Cuttlebug using this sandwich stake: A plate, Fiskars plate, two tan mats, B plate.
For the (Really Reasonable Ribbon) bakerÂ’s twine I frayed out the ends and tape them to the back to minimize the bulk and it worked real well, I have to remember that for the future!
Torn paper was used to create the waves. The boat was cut out leaving about a 1/32” white border all around.
Paper: Stampin Up - burgundy, brocade blue, Smart Papers – navy, Neenah – blue linen
Ink: Memento – Tuxedo Black, Stampin Up brocade blue, bravo burgundy, night of navy
Date: Saturday, October 22, 2011 GMT Views: 1223
Favorited:11
Registered: September 19, 2010 Location: Tacoma, Washington Posts: 8979
Sat, Oct 22, 2011 @ 7:18 PM
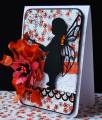
Gorgeous!! I love your sweet image and fabulous framing!!
------------------------------ God Bless!
DJ Rants Give thanks to the Lord for He is good, His love endures forever. 1 Chronicles 16:34 http://www.djs-creations.blogspot.com/