With a plastic stencil I sponged on the checked background for the base to add texture.
Ink distressing with Ranger tea dye ink was done on the base and vintage photo on all other panels.
For the brick embossing I inked up the embossing folder on the section that is sunk in which is raised once you emboss. I made sure lots of ink pooled on the mortar areas, it works best to rake the ink pad over that area and the ink is very noticeable on the folder when you have enough. After embossing I distressed with the vintage photo ink.
A Tonic paper perforator was used to tool distress the edges and the curling on the corners was done by rolling the paper with fingers.
The measuring tape is a paper embellishment (unknown company) glued to the card with AleeneÂ’s tacky glue.
The screws are brads from the company Forever in Time.
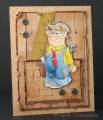
Copic colors used for the image: Pencil – YR15, Y19, E21, C7, Face – E02, E00, E21, Hair – C1,3,5,7, Jeans B91,93,95,97,99, Shirt – Y13,15,17, Tie R24,27,29, Hat – 40,42,44,47
Registered: November 4, 2006 Location: Midwest Posts: 24763
Sat, Jul 09, 2011 @ 12:16 PM
Love the leather-like distressed paper ... and thanks for the ink trick on the bricks ... they look fantastic too ... fabulous inspired masculine design.
Registered: July 18, 2005 Location: No matter where you go--there you are! Posts: 2963
Mon, Jul 11, 2011 @ 2:47 PM
Those bricks look like real adobe to me! Fabulous job on creating such a detailed and realistic background with props for your slightly befuddled-looking carpenter.