I packed in five techniques from TLC for this card. They are listed under techniques.
Steps to create:
The cardstock is an 80% glossy (not a high shine) which is forgiving and letÂ’s you remove color.
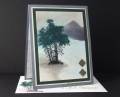
-The mountains – mask off the area with torn paper and sponge on Basic Gray from Stampin Up.
-Sky – use a sponge inked with Stampin Up Going Gray and drag it across the panel.
-Fog effect – wipe the mountains and sky area to the left of the panel with a wet wipe and the color will change to a hazy fog effect.
-Ground – watercolor with Going Gray liquid ink/re-inker from Stampin Up using artist brushes. Brushes – #10/0 detail, #5 flat.
-Lake – put a few drops of Bashful Blue liquid ink/re-inker from Stampin Up on a folded wet wipe and swipe it across the panel.
-Ink the trees image, trunks only with StazOn – Dove Grey. Using a stamp positioner put it in place before lifting the image and stamp the same trunk area again with Memento – Tuxedo Black and once again use the positioner. Clean the image and ink up the needles with a dark green marker (I used a retired Stampin Up color) and stamp and heat to dry the ink.
-The panel is covered with Ultra Thick embossing powder from Ranger, using VersaMark ink; two coats were applied, I then put it in the freezer to get cold which helps it the UT crack easier. If you ever need more defined lines for the cracked glass try rubbing ink over the cracks; remember to wipe with a paper towel so it doesn't smear onto the cardstock. I used Ranger Distress Ink - Old Paper.
-A piercing tool was used for placing the Making Memories brads.
Registered: November 3, 2005 Location: Fairport Harbor, OH-IO, Lake Erie shoreline Posts: 60427
Mon, Nov 22, 2010 @ 7:22 PM
Your knowledge of landscape allows you to make the most beautiful scenes. This is absolutely fabulous. Must say that I've never heard of 80% glossy paper - where do you find that?
------------------------------ Karen ~ Thanks for stopping by my gallery. Proud Fan Club Member - FS525, QFTD49 Life is better in a beach town!