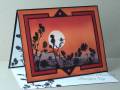
Measurements: Image panel - 4 1/4" x 3" plus 1/16" border, under panels 1 1/2" x 3 1/2" plus 1/16" border, 1/2" of the triangles are showing
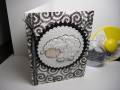
I played from this stitch kit and used the colors and flowers for inspiration. IÂ’m also going through a scenery and orange phase and itÂ’s helping me use up some scrap cardstock too.
Very funky site Stephanie and it was fun looking through their inventory to find ideas.
-Tear a large piece of paper in two pieces – one piece much smaller than the other.
-Masked off the ground portion of the panel with the smaller section of torn paper. I use repositional tape to secure the paper and I actually find the blue painters tape from the hardware store to be sufficient and a great price; I keep some pieces on the table, paper cutter and Cuttlebug at all times so they are handy when I need them and it takes away some of the sticky which is good.
-Punch a circle from a sticky note and place it on the panel for your sun.
-Ink up the brayer with orange and brayer onto the panel starting off the cardstock at the top and rolling back and forth and side to side to avoid lines. Now add the red in the same manner but avoid going down as far on the panel. Ink up a second time and repeat as often as you need to get the depth of color you like for both color applications.
-Remove the sun mask and without inking up the brayer go over the entire sky area to tone down the white. This does two things, one: it uses some of the brayer ink and two: it pulls the color from the ink already on the panel.
-Now cover the sky portion of the panel with the other piece of torn paper. Also place a second piece of torn paper at an angle which will be covering the bottom of the panel. The two colors will add depth when finished. Ink up the brayer with the lightest color brown and apply it to the panel. Remove the angled mask; cover the lighter brown and brayer on the darker brown.
-Now itÂ’s time to add the images using a stamp positioner.
-To pull some darkness into the bottom of the panel I covered the ground area again and added some extra orange which also pulled the black off the images, make sure that black is dry before doing this or skip it all together.
-The orange and red panel is stamped with red ink using the Stampin Up Linen image. These panels were also ink distressed.
-The triangles are the smallest photo punch from Stampin Up and I ran it through the Cuttlebug.
I think that covers it!
Date: Saturday, August 15, 2009 GMT Views: 2544
Favorited:49
Registered: October 18, 2008 Location: Arizona-It's a DRY heat! Posts: 4510
Sat, Aug 15, 2009 @ 1:08 PM
Such a gorgeous scene! Another one of yours into my faves!
------------------------------ Anne
Live Well, Laugh Often, Love Much The early bird might get the worm, but I would rather sleep late and eat chocolate!