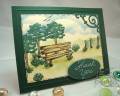
I kept her basic layout and colors, but changed mine to a scene, changed her circle layer to an oval sentiment and moved it and used a corner element instead of the dew drops.
I started my scene by stamping the bench, trees, fence and shrubs w/ the library green ink. I masked the bench and sponged in the ground using a torn piece of paper to mask and shade. Using another torn paper to mask the horizon, I used a handmade cloud stencil (thanks to Cindy, Mothermark for the idea) and sponged in the clouds/sky.
The bench was colored w/ markers and I doodled around the edges w/ a dk green gel pen. I embossed the sentiment w/ a cuttlebug folder then used a nestie oval to cut it out. I used a white chalk marker (Zig) to highlight the letters.
The hunter card front was scored, the image attached, then the die cut corner and sentiment were attached.
TFL
My blog:The Write Stuff. Sorry! I had to delete a bunch of really old posts from my blog & this is one of them.
Date: Saturday, May 23, 2009 GMT Views: 1320
Favorited:2
Registered: May 18, 2008 Location: Virginia Posts: 24623
Sun, May 24, 2009 @ 6:22 AM
OMG Julie, your cards are always a real piece of art!!! This scenery is fantastic. I just don't know how you do all this so well. You explain it in your notes, but it's so YOU I wouldn't even touch it!!! Makes me want to relax just looking at it!! Great job Julie!!! TFS!
------------------------------ Pam Co-Founder of The Punchkateerz! Fan Club Member FS149, QFTD44
Registered: July 23, 2007 Location: New York Posts: 2442
Sun, May 24, 2009 @ 10:39 AM
Very nice. The sponging looks wonderful!
------------------------------ My Blog My Gallery Fan Club Member "Do not go where the path may lead-Go instead where there is no path and leave a trail." Ralph Waldo Emerson