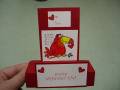
This card is a pop-up technique where you stamp and color a main image (in this case not a SU stamp, but could use anything image that can be segmented so give it depth), and also stamp and color 3-4 more, depending upon how many layers you want. You select and cut the portion you want at the front, with each successive layer including more of the image. In this case I did 3 layers plus the background. All the layers are colored the same, and then hinged so that they will pop-up as you open the card. I had just learned this technique and had this snowfriends stamp that was perfect for it. It was a ton of fun and now I am looking at every stamp to see if it can be layered as a pop-up! Take a look at the Envelope and front of the card also.
Date: Thursday, December 9, 2004 GMT Views: 8028
Favorited:103
Registered: September 27, 2004 Location: Posts: 35
Thu, Dec 09, 2004 @ 8:40 AM
To hinge the layers, first fold your card where the bottom of the background image is on the fold. When cutting out the layers, leave a 1/4" strip at the bottom of each layer. This is folded up to the bottom of the image to make the base strip. Begin with the back-most layer and use sticky strip to attach this line this against the fold of the card. I used two 3 hinges per layer - they are short strips of paper, 3/4" by about half an inch. The 3/4" length is folded in thirds making 3 sides of 1/4" each. One side (NOT the middle section) is taped to the back of the layer so the center strip will be UP. I put sticky strip on the other outside section, pulled of the red backing, and shut the card so that all 3 hinges will adhere at the correct spacing. Then I added the next layer in the same way. When you close the card, the hinges fold down. I know this is confusing to explain - I had to be shown how to do it. I also practiced on some cardstock pieces to get the method down.