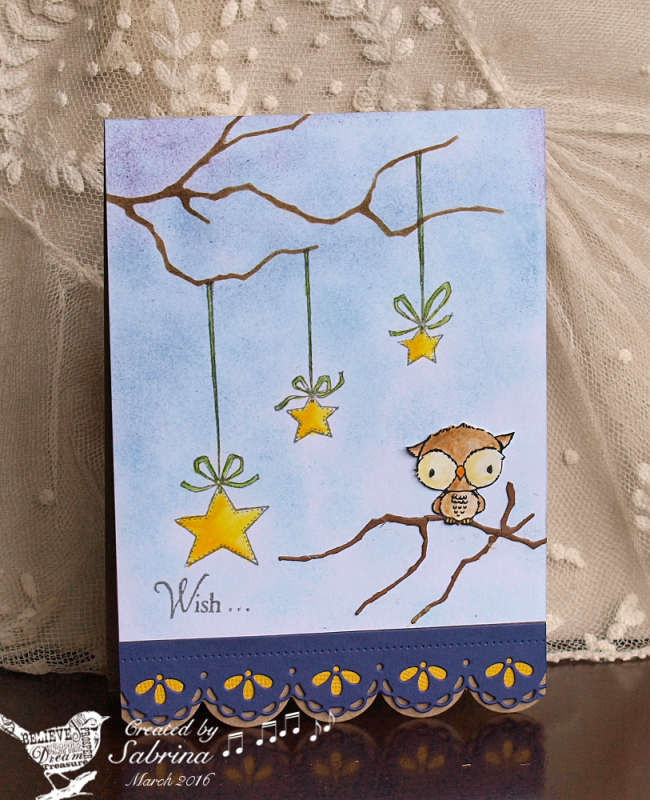
I started out by using the negative of the branch die to sponge in my branch in the top corner, and then stamped and coloured the stars. I didn't want a strong background, so I used a stipple brush. And then I looked through ALL my sentiments and couldn't find anything that was just right. I was afraid to mess it up by trying to put it through the printer - I use quite a heavy weight of card. So I added a positive die-cut branch, and a little owl, and managed to find a sentiment that at least could be masked to say "Wish". I added it to a kraft base; I scalloped the bottom edge with an MFT scallop border, and the blue strip is cut with a Taylored Expressions border die and has little yellow circles laid underneath.
Date: Wednesday, March 9, 2016 GMT Views: 1991
Favorited:7
Registered: February 10, 2016 Location: Hampshire, England Posts: 18
Thu, Mar 10, 2016 @ 1:29 AM
Thanks for explaining how your card evolved. The owl is gorgeous, the bottom scalloped edge is especially nice with the gold peeking through and the hanging stars are great.
Very cute and with a a pretty background. I really like your sentiment and the coloring on the owl. Nice work with the yellow peeking through the border to match the yellow in the stars
Registered: July 25, 2004 Location: Hog Wallow, KY Posts: 38242
Thu, Mar 10, 2016 @ 7:47 AM
Looks like that wise old owl is going to be wishing upon some beautifully placed stars. I like the edge you placed at the bottom and the light shinning through.
Splitcoast Dirty Dozen Splitcoast Challenge Hostess Teapot Tuesday TEAm
Registered: January 19, 2014 Location: Central Indiana Posts: 90987
Thu, Mar 10, 2016 @ 8:52 AM
Sabrina, I love the darling stamp you used and the great boarder die cut you used for a fun edge. This is cuteness to the max for anyone that really loves owls. Nicely done.