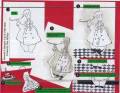
The chef, floor and background shading are all on one layer using the masking technique. I stamped the plater and cake on one scrap of white using my stamp-a-ma-jig to place them together just right. I used paper snips to cut out the cake/platter (good scissors are a must for delicate litte things like this). Notice that I also cut around the candle without the flame. I hand drew the flame and glow lines then added glitter over the glow area. The message barely fits on the tag so stamp first on scrap of white then line up tag punch. More details are included in the seperate catagories below. I am proud of this creation and it is somewhat unique. I was able to save a lot of time creating this card thanks to some talented photos shared in this great SCS gallery. It was such a blessing to see other cards before diving in on this cold. I got the cute oval punch idea from Colleen Schaan Gallery at Splitcoaststampers
And the great floor idea from Miss Minx: Gallery at Splitcoaststampers
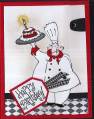
For the inside: I enclosed a Restaurant gift card. I just cut a piece of white cardstock 3-5/8” x 15/16” and used my slit punch to hold the gift card in place. At the mid top and mid bottom of this white cardstock push the slit punch all the way against the edge of the paper and punch. A gift card will fit perfectly (mounted horizontally). There was also just enough room above the top slit to stamp Bon Appetit. Since the card is a folded red card, when I adhered this white layer inside there was a perfect ¼” red frame showing.
Ink: Sahara Sand (sponged to shade around mask), basic black classic inks, also used markers: real red, basic black (for shoes), going grey, summer sun
Accessories: small oval punch, silver brad, tag punches, black grosgrain, hobby blade (cut slits by pants to insert black strip of cardstock), dazzeling diamonds glitter, pink chalk (for cheeks), paper snips, glue pen (for glitter)
Registered: February 13, 2005 Location: Barrow, AK Posts: 526
Thu, Mar 22, 2007 @ 11:24 PM
I just ordered this set and was excited to see what you have done with it. Thanks for all of the other info, how fun to see where various parts of a card come from .
WOW!! Boy am I glad to have ordered this set now as one of my SAB choices! I will CASE this idea (or your other one) for sure. The one thing I think I might try in addition is to leave the mask on and then put Versamark over the whole floor, apply a little clear detail ep and emboss to make the floor look like it's been waxed.


 .
.