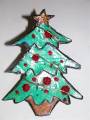
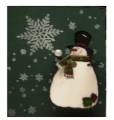
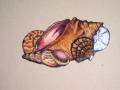
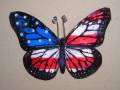
I learned how to make these cool paper pins at a recent big Team Meeting of my upline's. I'm doing a Paper Pins Class for customers soon, so I made these samples. Some have glitter on them, but you can't always see it in the scans.
Date: Tuesday, April 5, 2005 GMT Views: 2838
Favorited:81
Stamps: In the Wild, Mon Ami, Stipple Shells, Coast to Coast, Flower Garden, Going Out in Style, Memory of the Heart, Fantastic Foliage, Wonderul Wings, Cute Critters, In Full Bloom
Registered: November 9, 2004 Location: Green Bay, Wisconsin Posts: 150
Wed, Apr 06, 2005 @ 12:25 PM
I would also like to know how these were done. We have a convention coming up in less than 2 weeks and I would love to do up a bunch of these to take along for trading. [email protected]
Registered: October 6, 2004 Location: Eldersburg, MD Posts: 3631
Wed, Apr 06, 2005 @ 12:39 PM
Here's the directions that I got and used. Have fun!
Paper Pins
1. Stamp the image two times with Basic Black on US White cardstock.
2. Color with Stampin' Write Markers. You need one perfect image for your top layer. You need to color a second image for the bottom. Note: you could also paint with Pearl-Ex, colored pencils, Blender Pens, Stampin’ Pastels, etc....use your imagination. We kept it simple for class by just using regular markers. Keep in mind there will be some bleeding and blending of color.
3. Cut out the two images very carefully. You can cut off the antennae if doing a bug or butterfly.
4. Use a soft med-sized paintbrush to apply one layer of Tacky Glue to the backside of the top image (your best one).
5. Grab a piece of 26-gauge wire shaped into an antennae and hold that in place. Stick the top image to the bottom image (colored side facing out on both), squeezing the antenna in between. Skip this step if not doing something that would have antennae!
6. Leave it to rest for about 1-2 minutes, and it will start to get stiff. Take your fingers and a stylus tool and start molding and bending. You may find that cutting between the wings gives you more ability to bend the surfaces. Crease along the body and bend up. Keep working it-you may get a little messy. Have some wet paper towels or baby wipes handy.
7. Once the pin is shaped, put it aside to dry and start your second pin, same instructions.
8. When the second pin is shaped, go back to the first pin.
9. Look at the edges of the image - if they do not match up perfectly then trim with the paper snips. If your glue is dry, try running a black permanent marker around the edge of the image to eliminate any white edges (makes a nicer finish).
10. Now, take a soft brush (those foam ones work great) and GENTLY brush a quick layer of Modge Podge over the top and the bottom of the pin. You might get some blending of colors -this looks pretty. Let it dry. Do two more coats, letting it dry in between. On the third coat, you can attach sequins, beads, add glitter, etc. before it dries.
11. Finally, attach the pin back. We found that the tiny round magnets and washers work best (use E6000) since pin backs are too hard to open/close and tend to fall off if the pin is tugged or twisted.
Be warned that the red color family inks tend to run a lot when applying the Modge Podge.