Registered: February 19, 2004 Location: Sunny AZ Posts: 342
Sat, Mar 12, 2005 @ 9:44 PM
I modified the original one posted by samanthastamps. Here's the measurements and how I put mine together. Modify it to your preference!
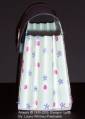
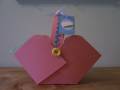
Purse Card Box
Materials:
Matte board or stiff card board (I used manilla file folders from Walmart and covered them with the stamped cardstock for extra durability!)
2 – 5 x 6 ¾�?
1 – 3 x 6 ¾�? for the inside bottom
US White Cardstock:
2 – 6 ½ x 8�? Ultrasmooth White cardstock to cover the 5 x 6 ¾�? pieces above. I mitered the corners, folded them over then adhered them.
2 – 4 ¾ x 6 ½ to cover the inside that still shows after you cover & miter the 5 x 6 ¾�? pieces with the 6 ½ x 8�? pieces above
2 – 4 ¼ x 5 ½�? (half sheet) for accordion fold – score these every ½�? AFTER you stamp them
1 – 3 x 6 ¾�? for the inside bottom (to cover the matte board/cardboard, manilla folder)
Coordinating Cardstock:
1 – 4 x 6 ¾�? for outside bottom – score at ½�? on the long sides ONLY
1 – 5 ½ x 6 ¾�? for the top flap. I cut mine to a point at the center, you can do as you please :o)
Velcro, Dimensionals, Tacky Tape, Metal Edge Tag or embellishments of your choice.
Directions:
1) Stamp ALL US White CS - (2) 6 ½ x 8�?, (2) 4 ¾ x 6 ½�?, (2) 4 ¼ x 5 ½�? and (1) 3 x 6 ¾�?
2) (Optional) Stamp your coordinating pieces of cardstock for your top flap and bottom of your purse.
3) Adhere your (2) 5 x 6 ¾�? pieces of matte board/cardboard, file folder by centering it in the middle of your (2) stamped 6 ½ x 8�? pieces of US White. Miter the corners, glue/tape and fold over to cover the matt board/cardboard, file folder.
4) Adhere your (2) 4 ¾ x 6 ½�? Stamped US white to cover the inside center of the piece you just mitered and covered. Set aside.
5) Take your 3 x 6 ¾�? sheet of Stamped US White cardstock and your 3 x 6 ¾�? piece of matte board/cardboard, file folder and adhere the stamped piece on top.
Putting it all together. I stitched mine so it would not come apart and would hold up for a long time.
Leaving EVERYTHING flat:
1) Take your (2) covered 5 x 6 ¾�? pieces and your coordinating 4 x 6 ¾�? outside bottom piece, line each piece up along the ½�? score line and adhere. Careful that you have the images going in the proper direction - front facing out before adhereing.
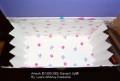
2) As these pieces are still lying flat, take your 3 x 6 ¾�? strip and adhere it in the middle of your coordinating bottom piece of cardstock in between the score marks
3) Take your 5 ½ x 6 ¾�? top flap and adhere it to one end of your 5 x 6 ¾�? sheet, overlapping about an inch.
If you are stitching your purse together, now you can stitch along the edge of the entire long piece all around the outside.
Finishing:
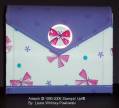
1) Take your (2) 4 ¼ x 5 ½�? scored & stamped accordion pieces and fold them accordion style on the score marks. Take some tacky tape and run a strip of it along each end paying attention to where the ends will meet the sides of your purse when the sides are in the upright position. Attach the accordion pieces to each side.
2) Fold your top flap over, mark where you want to put your “latch�? (I used velcro) and place your velcro in position.
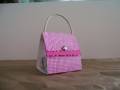
3) Embellish the front of your purse however else you’d like. I used a metal edge tag and dimensionals to adhere a stamped butterfly to the front after I covered it in Crystal Effects and let it dry so it added some dimension on the front of my purse. You could also add a handle. I recommend if you do, you reinforce the coordinating cardstock on the inside before you put eyelets in to hold any ribbon you use for a handle. That will protect it from tearing if someone picks it up by the handle while it’s full of cards. I opted to leave mine without a handle for this reason.