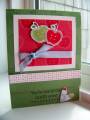
This scrap book is SO fun to make! You end up with 9 6X6 and 12 6X2.25 "doors" to add photos to....it's soooo easy and fun! You take 3 12X12 cardstock sheets and 5 DP sheets and cut the 12X12 in 1/2 (to 12X6). I learned how to do this from Patsy R. (I don't know if she has a SCS gallery here or not). Look below (in the comments) if you would like the full directions and if they don't make sense, please PM me!
Date: Wednesday, February 27, 2008 GMT Views: 1383
Favorited:76
Hi!
I've had SO many requests for directions....below I will post the directions that a fellow stamper in my group of uplines typed up for us! I hope this helps....if you have any questions, don't hesitate to ask!!!
FOLD-OUT ALBUM DIRECTIONS
Supplies required:
3 sheets of 12x12 inch solid cardstock
5 sheets of coordinating printed paper
1 yard of coordinating thick ribbon
Strong adhesive (such as sticky strip) and ordinary adhesive (such as SNAIL)
Cutting and scoring blades on paper cutter
Bone folder
Instructions:
1. Cut each sheet of solid paper in 1/2 so you now have 6 sheets of 6x12, put aside 1 of the 6 for the cover
2. Score remaining 5 sheets from 3 inches on both ends so the sheets are scored at 3 inches and 9 inches (on the long side)
3. Fold all of the scores inward. Line up all your pieces in a long row so you have all your flaps facing up and your 6X6 parts laying flat on the table. It should look like this:
\_/\_/\_/\_/\_/
4. Adhere the 3 inch scored pieces to the neighbors 3 inch scored piece
5. Lay the piece flat so all the 3 inch scored doors are facing upward, you should have 5 panels (6X6 pieces). Close the doors so that panels 1, 3, and 5 are covered.
6. Fold panel 1 in over panel 2 and panel 5 in over panel 4, fold once inward so you have a square. This will not be completely flat, simply squish is down so it is flatter.
7. Cut each of your printed papers at 5 3/4 inches so you have 5 sheets of 5 3/4x12 inches and 5 sheets of 6 1/4x12 inches. Cut the 5 sheets of 5 3/4x12 inch sheets into two squares of 5 3/4 inches. You should now have 10 5 3/4 inch squares. Save the lil' leftover strip for embellishment.
8. Reopen your book. Adhere the 5 5 3/4 inch to panels 1-5 as desired.
9. Cut the other 5 3/4 inch squares into 2 3/4x5 3/4 inch strips. Adhere the strips to the front and back of the doors on panels 1, 3, and 5 as desired.
10. Continue closing your book and covering with printed paper until only the middle back is uncovered.
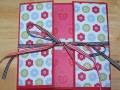
11. Dig out the 6x12 inch solid cardstock you put aside and score at 3 inches and 2 1/2 inches AND 9 and 9 1/2 inches to create some room for the thickness of your book. Lay out the newly scored piece and adhere the ribbon across it in the middle. Cut slits on the scored lines nearest the center for the ribbon to pass through. Thread the ribbon through these slits.
12. With your book closed adhere this new cover to the blank back cover of your book. Cover the new front panels with 2 1/4 x5 3/4 inch printed paper.