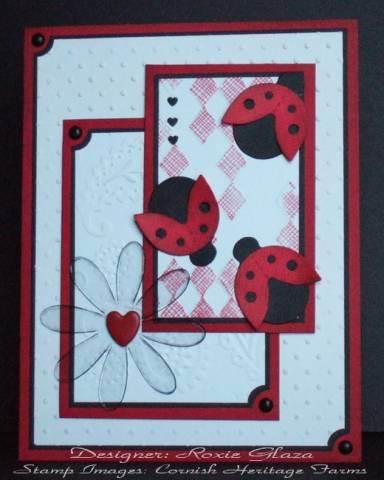
IÂ’m playing with my new Cuttlebug embossing folders and have a good time too!
-All embossing by Cuttlebug.
-The red border and ladybug wings are stamped with Cornish Heritage Farms.backgrounder images then ink distressed.
-The ladybugs are a Sizzix die cut, I donÂ’t own one but my sister in law keeps me supplied with these little insects!
-The ghost flower is from JoannÂ’s. I used a black Sharpie marker on the edge so it stands out on the card. Bend those flowers to get the marker down to the center. Crop a dile punched two holes for each prong to fit into, and then squeeze back together to fit through one hole in the card.
To keep the flower at an even depth since it lies on two panels of the card…I first punched a 1/16” circle in scrap cardstock, then punched a ¼” circle over the smaller one so I have a black, red, and white one that I slide onto the brad prongs and it will keep the flower at an even depth on the card. I also build up the top and outer side of the ladybug panel to keep that depth even. Hope that all makes sense…sometime a blog would be nice right! Nope…to much work for me!
If by chance you get a mark where you didnÂ’t want it (I always do) the extender solution used with Tim Holtz alcohol inks and a cotton swab will remove it. It also takes the glue off your scissors like a charm!
-To stamp only the raised portion of the diamond panel, very careful lie it on the rubber after itÂ’s inked up of course. Only press lightly on the raised portion one at a time. If by chance and I did get it on the flat portion I just did a fast little embossing with the stylus (look just above the heartÂ…itÂ’s a fixed boo boo). Also some others were covered by the die cuts.
-Stampin Up ticket punch for the corners and Fiskars 1/8” heat punch for the lady bug panel.
Date: Wednesday, February 27, 2008 GMT Views: 1616
Favorited:10