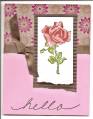
I learned this technique from my last Stampers 10 class. We used little strips of Designer Paper and kept putting them on! I love the way it looks so I had to go hame and create this card using that same technique!
Here are the instructions
I cut a square of white cardstock 4 1/4 inches.
center square - brown cardstock is 1 1/2 inches
stamped white center is 1 1/4 inches. Add a brad.
All of the strips are 1/4 inch.
I fold the big white square in half both ways to get lines just so I can place the center piece exactly center.
Then I glue it down.
Then I start to glue down the strips of designer paper.
You can see they are evenly placed using the center square as a guide, starting from the inside out.
Trim all of the overhang designer paper when you are done. The I glued the entire completed square onto my pick card.
Then I glue down a strip of Chocloate chip cardstock right next to it on each side.
Attach the ribbon, and your done!
It is very easy. Just PM me if you have questions.
Tina
Date: Saturday, February 23, 2008 GMT Views: 1035
Favorited:32
Registered: April 19, 2004 Location: Bemidji MN Posts: 1704
Wed, Mar 12, 2008 @ 5:44 AM
Ohhhh, how lovely! I will have to look into this technique! Love the colors you choose and also the dp. Really sets off the little flower in the center. Beautiful card! TFS!
Sue
------------------------------ Take a peek at my gallery and my new albums!