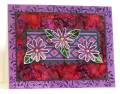
I like the end surprise with polished stone and if you donÂ’t like it, add a little more ink which is what I did when it came a bit to red. And I like created these borders in place of a background image.
-The flowers and leaves are heat embossed with Ultra Thick powder and attached to the card with Diamond Glaze which works better than tacky glue with glossy paper.
-The panel under the flowers is covered with Cuttlebug die cut. The triangle border is the cut outs from the die cuts. Why throw it out!
-The corner pieces are also from the die cut but heat embossed with clear powder. I used the VersaMark pen to ink them up after I attached to scrap paper with just a tiny touch of glue so they wonÂ’t blow away when embossing.
-Flower centers are Diamond Glaze and ink applied with a straight pin.
-Stamp positioner was used for the border.
-Gems are also attached with Diamond Glaze
Date: Monday, October 29, 2007 GMT Views: 977
Favorited:5
Registered: May 30, 2006 Location: In my Manitoba stamp room - hiding from housework Posts: 235
Mon, Oct 29, 2007 @ 6:29 PM
This card is really striking, Rox. I love all the little fiddly details and they really make your work pop, as if the red and purple hadn't done just that!
------------------------------
- Michelle -
-Never be afraid to try something new. Remember that a lone amateur built the Ark. A large group of professionals built the Titanic. -Dave Barry-
Wow! What a beautiful piece! The polished stone is absolutely fabulous and the die cut panel for the flowers is, also! Love the gems in the diamonds and the outside triangle pieces! A work of art if I ever saw one!
Registered: March 24, 2005 Location: by a stream and a pond Posts: 2020
Sun, Nov 04, 2007 @ 4:05 PM
You are the Queen of polished stone technique. THis is fabulous. Still need to take lessons from you.... too bad you are so far away.... I just love the red and purple together... I sure wouldn't have thought they would go together... did here. This is just beautiful!