Awesome! please share with us, did you make your own template,or buy it already made! This would be a great workshop! please share. Thanks for your time.
Registered: July 13, 2004 Location: North Bend, Washington Posts: 177
Wed, Feb 02, 2005 @ 9:41 AM
Love this too! What a terrific way to organize. Will you please share how you made this?? Thanks for sharing!
------------------------------ "Friends are the sweetest things," said Pooh,... "even sweeter than honey." ** A scrapbooker lives here... with her memory makers **
Registered: August 30, 2004 Location: Austin, Tx Posts: 5757
Thu, Feb 03, 2005 @ 7:10 AM
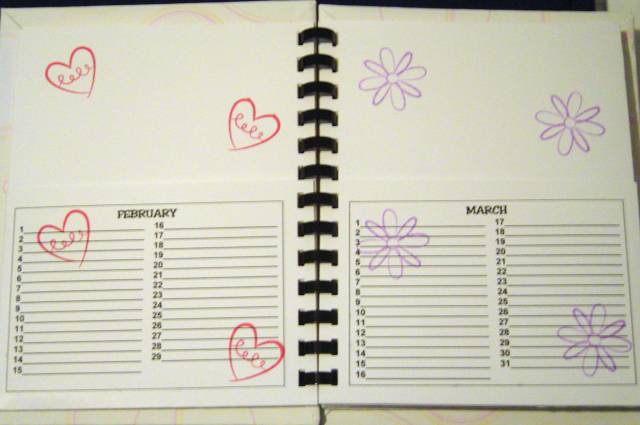
To make the pages, you take six 12x12 pieces of US White cardstock and score it at 4 1/4 and then fold. Then you fold the pages in half. The folded part goes toward the outside of the book and the loose part goes towards the binding. I printed out the calendar pages from my computer onto US White cardstock. For the cover, I used cardboard from boxes. I tried using foam core board, but it was too thick to fit into the binding machine. The cardboard covers measure 6 � x 8 �. I covered them with designer series paper. To bind the book, I went to my sister's school (she iss a teacher) and used their binding machine. Almost all schools have this machine. Print shops will charge you at least $3 and I wanted to keep the costs down. You can buy the plastic combs at any office supply store. When you punch out the holes, pay close attention to guide. You want to make sure you cut all the pages in the same place. Make sure to push your page ALL the way in on the machine or it will be too close to the edge. I suggest you bring some extra paper to practice with so that you do not ruin your nice cardstock. The cardboard cover was a really tight fit into the machine
If you want the calendar template, feel free to email me at [email protected] . It is a word file and I will gladly send it to you. I am glad you like my organizer. We had a lot of fun making it.