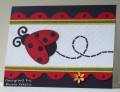
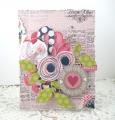
IÂ’m trying to use my punches more so I came up with the lady bug. I havenÂ’t seen it done before but it probably has!
The large Stampin Up oval was used for the red wings, EK Success -1” circle for the under body and swirls for the antennas, Marvy - ½” circle for the head, Fiskars - ¼” for spots, McGill - ribbon punch for the trail and 1/8” circle for the scallops dots.
The lady bug goes together real quick with no cutting, the trail – not so quick!
*I ink distressed the wings.
*Stamped with backgrounders on the scallops, straight trim and flower.
*I used the embossing stylist to shape the flower; lay it on a paper towel, roll the stylist in a round circle motion then down each petal.
*The white panel is embossed with the Cuttlebug and that rubbery shelf liner. Tosh/Stamps4funinCA used it to cushion the embellishments when she me a card. Thanks Tosh!
*Tacky glue was used for all assembly of punched shapes and strips. ItÂ’s easiest to squeeze a drop out and use a long straight pin for a tool touching pin to glue then to the cardstock shape.
Date: Wednesday, September 26, 2007 GMT Views: 923
Favorited:26
Registered: June 29, 2004 Location: Sugar Land. Texas Posts: 79435
Wed, Sep 26, 2007 @ 6:40 PM
Cute ladybug!
------------------------------ LizThe joy of the LORD is my strength.Right Brain Madness --My blogProud member of the redDivasKSS certified multi-step stamperFan Club member since 2004