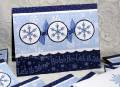
The photo shows a little of the sparkle of the DD glitter inside the punched snowflakes. I put Brocade Blue cardstock through the xyron, then adhered the snowflake punched white cardstock on top. This left only the snowflake image sticky, and I dumped the glitter over that. I brushed off the excess glitter and then punched out the snowflake using the 1 1/4 inch circle punch.
The snowflake designer paper is adhered to the scalloped white layer first, then punched with the 1 3/8 circle punch so the Night of Navy base cardstock shows through around the punched snowflakes. This also made that layer sturdier for tying on the ribbon.
I added a few dots of glitter on the wheel snowflakes using my Sakura quickie glue pen.
Please see Chris Smith's tutorial for more details (link above).
Date: Thursday, June 7, 2007 GMT Views: 2058
Favorited:46
Registered: August 11, 2005 Location: Saskatoon, Canada Posts: 993
Thu, Jun 07, 2007 @ 9:28 AM
I have been DYING to do a Christmas card this week and you just gave me permission, lol! Where I live it's a bad idea to even think about Christmas because it could snow! Great colors and layout. Love the scallops and the wheel on the bottom...
Registered: November 22, 2005 Location: Oklahoma Posts: 3569
Thu, Jun 07, 2007 @ 11:29 AM
This is sooo pretty! And it reminds me that I NEED to get busy on my Christmas cards.
------------------------------ Sharlene My Gallery - My Stampin' Up! Website "Let the words of my mouth, and the meditation of my heart, be acceptable in thy sight, O LORD, my strength, and my redeemer." Psalms 19:14