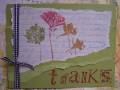
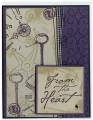
Another dry embossed card done through the cuttlebug. here are the directions:
Plate a, plate b, mouse pad cut to size of plate, cardstock, brass stencil, plate b. "Sandwich may need to pass through several times based on cardstock thickness."
That is the info i found on this site somewhere but I found I needed 2 thicknesses of mousepad to get a good impression.
TFL!
Date: Sunday, January 14, 2007 GMT Views: 1516
Favorited:41
Registered: November 22, 2005 Location: Illinois Posts: 377
Sun, Jan 14, 2007 @ 4:09 PM
Oh wow...this is gorgeous!! How did you get the colors on the letter like that? What embossing plate did you use? Sorry, so many questions, but this card is cool!!!
------------------------------ Everything is relative!!
Registered: August 9, 2006 Location: Central Oregon Posts: 2092
Sun, Jan 14, 2007 @ 4:21 PM
This is really really cool!! So soft and pretty...great colors. I'm a little confused on the instructions too, but my cuttlebug is ordered and on the way. I didn't know you could use brass templates for embossing with cuttlebug. Would you not have gotten the same result by using the stylus and your embossing plate??
Registered: October 13, 2004 Location: near Lake Michigan Posts: 10005
Sun, Jan 14, 2007 @ 5:06 PM
NancyRuth, The contrast of the blush against the scrolled pattern is gorgeous !!! You lost me after plate a though, can you tell I have no knowledge about the Cuttlebug