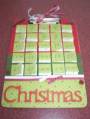
Directions: Measure your cardstock for the top half of the clip board. Cut out a notch for the clip part and adhere to the clipboard.
-Use one other plain color cardstock for the middle section of the clip board. Measure, cut and adhere it to the clip board too. You may want to add small square of other colors for a collage effect or leave it plain. For the bottom section, use a patterned piece of paper-this could be the same one you choose for the square doors for the advent calendar or choose another that matches.
-With the square punch, punch out 25 plain white squares and 25 patterned squares. With snail adhesive, glue the top or the side of the patterned piece to the white pieces. You can alternate which way you glue it so that some doors will open up and some to the side.
-Inside each square, stamp a holiday image.
-On the front of each patterned square, stamp the numbers from 1-25.
-Arrange your squares in 5 rows of 5 evenly before gluing them onto the clipboard.
-Add ribbons and other embellishments.
Date: Monday, November 13, 2006 GMT Views: 2632
Favorited:27
Stamps: Brushstoke numbers, Mini stamps from several stampin up sets such as: Hung Up on the Holidays, Happy Winter, Snowflake Spot, Little Holiday Wishes, Bundle Up, Festive Favorites, Perfect Ending, Glad Tidings or Little Somethings.
Paper: -Bazill red and Hunter Green Cardstock (Bravo Burgundy and Handsome Hunter would be the Stampin Up colors I would use but did not have on hand for this project)
Ink: summer sun, basic black, real red, brilliant blue, garden green and ruby red.
Accessories: -Red Glitter, , 1 1/4 " square punch, whie and burgundy grosgrain ribbon, and Rich Regal Buttons