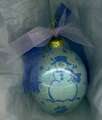
I made this one for a very special stamping friend. (Hi Maggie!)
Here is the tip sheet I wrote on how to do these.
Sparkling, Glitter
Ornaments
By Colleen Kidder
Supplies:
* Clear glass ornaments (this year there are all shapes and sizes, from bells to tear drops, to squares)
* Stamps of choice
* Liquid Laminate by Beacon (I have a scan of the bottle of this but don't know how to upload that here.)
* White tissue paper
* Long, thin brush that has been specially made for doing this. Usually found in the craft section of Michaels or you could use a chenille wire-pipe cleaner and bend it as desired. (Again, I have a scan of the brush I'm talking about but I don't know how to add it in this forum.)
* SU! Craft pads and fabrico markers or use the new Stampin'Write Journalers to add color. (You can also use chalks with blender pen to set them . . . great when you need an opaque white; or you can use the blender pen with the craft pad. Just be sure the blender pen is nice and juicey so you don't rip the tissue paper. DO NOT use Staz On inks or Sharpie markers. The Liquid Laminate will actually cause those types of ink to bleed.)
* Dazzling Diamonds Glitter (or other ULTRA FINE glitters)
* Funnel (makes it easier to put glitter in)
* Heat gun
* Empty 35 mm film cartridge to set ornament on or use an empty egg carton
* Gold or silver metallic cording (used to hang ornament)
* Color of organdy ribbon that corresponds to your color scheme
Directions:
1.) Using Craft pads stamp your design onto the tissue paper. Be sure there is a piece of scrap paper under your tissue as sometime the fabrico will bleed through. Plan on stamping a couple extra just in case you need them. Heat set. (Note: For a more defined edge sprinkle embossing powder on the stamped image and then heat to emboss. Although this takes a bit more time it will make such a difference in the finished project.)
2.) If you were not using a bold solid stamp in step one you may now want to color in your image with markers. Heat set. Heat set so the markers won't bleed when the liquid laminate is poured in.
3.) Cut out the tissue paper stamped images. You don't have to be right on the edge of your design but do cut them fairly closely to the edge.
4.) Remove metal top of ornament and set aside.
5.) Squirt Liquid Laminate into the ornament so that you have 1/2 inch in the bottom of the ornament. Now put your finger over the top hole of the ornament and swish around so that the laminate will cover the entire inside of the ornament.
6.) Loosely wrap the tissue-stamped images around the end of the brush that doesn't have the bristles on it. This sort of creates a curve to the tissue paper that will help to insert it into the ornament top without it sticking to the top edge. Once you have it rolled move it back to the bristle portion of the "wand". The next step is to insert it into the ornament. When the tissue paper has been "rolled", quickly insert it into the top of the ornament by either placing it on the brush or else just dropping it in. I prefer the "on the tip of the brush" method because it won't roll up on itself. The goal then is to place it on the side of the ornament where you want it as you are inserting it in. This is tricky but it's easier as you go along. It may fall to the bottom. If it does allow it to be dampened with the laminate and then you can gently "nudge" it into the place where you want it.
7.) When you are finished inserting all stamped images into the bulb, squirt a few more drops of liquid laminate and swish around to coat entire areas of the bulb including the tissue-stamped areas. Then turn your bulb upside down into the empty 35 mm film container and allow the excess laminate to drain out. (Be sure to not squirt in too much more laminate or you will end up with your tissue sliding down as the ornament is draining.) Do not allow it to set too long this way or it will dry before you do your next step.
8.) Next, place your funnel in the top of the ornament and pour glitter in. Swish the glitter around. It will cover everything and you will not be able to see the tissue paper edges anymore. It will appear that the image was painted on from the inside! Dump the excess glitter into a separate container (perhaps another empty film container) because it may have residue of the laminate in it.
9.) Place the top back on the ornament and tie metallic cording onto top curve so that it can be hung from a tree. Finally tie organdy bow onto top curve and you are done.
Stamp Set Choice Ideas:
* The first one I ever did was just a candy cane (pretty easy design, just placed the stamped tissue paper image randomly around the inside ball.)
* All the snowmen SU! carries look awesome in these.
* Also just snowflakes that have been stamped on the tissue paper and then embossed with silver EP.
* This is the perfect way to display the now retired "The Miracle of Christmas". Just emboss the stamped image in gold first, color in, and be sure to add in some of the larger star glitter. . . breathtaking!
* Stamp some sayings too . . . anything is wonderful when placed inside these glitter ball ornaments!
Idea File:
* Make one of these special ornaments for everyone you give gifts to or even for your special hostesses. You can personalize with their names by using the Zig painty pen in gold or silver.
* Allow your children to each make one of these and add the year they were made. We like to add one special ornament a year to our tree for each of our three children. By the time they leave home (after college) they will have 22 ornaments to take with them . . . enough to start their own small Christmas tree.
* You can buy ornament stands in craft stores around the holidays for around $1.50. This is a fabulous way to display these beautiful creations.