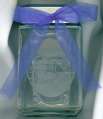
I decided I'd use all four of the Changing Season stamps on this container. We've used it all season long but not for cookies . . . for a mixture of nuts, raisens, and M&Ms (my hubby's favorites.)
ALSO, BE SURE TO READ THE COMMENTS SECTION BELOW (look for my posts). I HAVE ANSWERED SEVERAL QUESTIONS AND GIVEN TIPS IN THAT SECTION THAT YOU MAY NOT WANT TO MISS!
Okay, since everyone is still asking me for directions I decided to move them up here. (They are also in the comments section.)
DIRECTIONS:
I've been glass etching for years and using my stamps to assist me in the process but it is usually too time consuming for the average stamper. That is why I was very excited this past Christmas when I was able to come up with a QUICK way to successfully etch the covered bridge stamp set onto serving platters and cookie jars. The fine detailed stamps have always been more difficult and my simple solution was something I'm sure you've all already thought of. If not keep reading for instructions.
------------------------------
Frostbitten! Etched Glass
By Colleen Kidder
------------------------------
There's nothing more delightful than when Jack Frost comes nipping at your nose or, better yet, leaves his magic on your windows. You can create the same pretty effect on glass items this holiday with a process called glass etching. Food gifts are all the sweeter when packaged in glass jars and containers that have been etched by the gift-giver. Bees buzz on the cookie jar, inviting cups of coffee steam on the canister and a snazzy harlequin pattern dresses up the candy box. Create your own designs to suit your personal style or holiday celebrations. Use your imagination to create personalized designs, but be sure to practice on an old piece of glass or on paper before applying the etching cream to a favorite glass or plate. Once the design is etched, it is permanent.
Basically there are two ways to do glass etching and I will cover both below.
Embossing Powder/VersamarkTechnique.
------------------------------
The first way is the easiest way that I've found to do glass etching. It requires Clear Embossing powder and a Versamark pad. (Really any pigment pad and any embossing powder will do.) This is the technique to use when etching with those fine-lined (detail) stamps. Doing glass etching this "new" way will be the easiest, quickest thing you do. I promise.
Materials List:
* Embossing Buddy
* VersaMark
* Clear Embossing Powder
* Heat Gun
* Armor Etch Glass Etching Cream (from Armour Products, Wyckoff, NJ)Can be purchased in most craft stores such as Hobby Lobby and Michaels and some JoAnn Fabrics.
* Medium bristle paint brush
* Glass Item
* Windex and Paper towels
* Clear Contact Paper to Create Oval Mask (if desired)
Directions:
1. Clean glass item with windex and paper towel to remove finger prints. (Important as the etching cream will pick up oils from our fingers and the prints will end up 'etched' into our finished project.)
2. Dust glass object with Embossing Buddy and remove stray powder (wipe away with hand.)
3. Stamp image onto glass using VersaMark.
4. Sprinkle on Clear Embossing Powder and heat to melt. (Glass takes a bit longer to get hot so it will take a bit longer than when you emboss on paper . . . oh, and don't hold the object unless you enjoy burnt fingers.) :o)
5. Apply etching cream using sponge brush. and let set for 5 minutes.
6. Rinse using fairly hot water and your fingernail (under the running water) to remove the Embossed image.
TOTAL PROJECT TIME: 15 minutes . . . if you stamp REAL slow.
Stencils Technique.
----------------------------
The second way to do glass etching is a bit more time consuming but is a more traditional approach. Creating your own stencils is the most time-consuming part of this project. Expect to spend about 30 minutes preparing and applying the first image, depending on the level of detail. Cleaning and etching the glass may take only five to seven minutes.
Materials List:
* Glass item to work with such as; glass pane, tile, cup, mug, goblet, vase, plate, pitcher, votive . . . If you think of it you can stamp on it!!
* A Stamp: Any. I like the bolder stamps for beginners
* Staz On (any color)
* Armor Etch Glass Etching Cream (from Armour Products, Wyckoff, NJ)
* Medium bristle paint brush
* Rubber gloves to protect your hands
* Exacto knife one with a swivel head is great but any will do.
* Clear Contact paper (use Contact brand for best adhesion)
* Windex and Paper towels
* Timer
* Running water or sponge
* Optional: A paper punch that matches your stamp
* Another idea: Use Stampin! Up stencils (metal or plastic) from page 229 of the catalog. Trace, cutout and follow instructions below.
Instructions:
1.) Stamp on the Contact Paper with Staz On and allow to dry. It will only take a second or two.
2.) Using an exacto knife cut out image either in positive or negative form. This depends on if you want to put the etching cream in the image or if you are putting it on the rest of the glass item and you want the image to be the only area that remains smooth. Be sure to trim the image CLOSELY and PRECISELY.
3.) Clean glass item thoroughly with windex and paper towel and be sure to not touch it again where you will be stamping or you will have finger prints in your final etched product. Even clean fingers leave a residue of oils from our skin.
4.) Cover the glass with your now trimmed Contact images by peeling backing away from clear plastic. This is now your stencil. Where there is no vinyl is where the etched design will appear when you are finished. Where there is vinyl the glass will remain smooth. You can now use your matching punch to create smaller stencils to be applied to glass as desired (such as the flower punch to match Flutterbys or a snowflake to match Frosty, etc.)
5.) Put rubber gloves on. Apply a THICK LAYER of Armour Etch Cream brushing up and down, then left and right to spread the cream over the entire stenciled area. Let the etching cream remain on the glass 5 minutes.
6.) Wash off all traces of Armour Etch Cream with ordinary tap water. Remove the vinyl and thoroughly clean the glass one more time using windex.
7.) If you want to you can now take it one step further and stamp on the frosted glass. (The frosted glass provides a great surface for embossing ink and powder to "grab" and hold onto however don't wash in the dish washer.) Using a Fabrico pad stamp your design. The best technique for this is to lay the stamp on the counter and roll your round item (such as a votive) across the top. If you smudge the design just wipe off with a wet towel, dry and try again. When you get the image you want, sprinkle on embossing powder. Heat to melt powder and you are done.
Idea: You can use gold embossing powder on top of the etched glass to add a nice touch. A great personal gift to give as a wedding present is to etch a pair of goblets with leaves or hearts. Then using gold embossing powder and an alphabet stencil emboss the Bride and Groomâs names on them or their wedding date. You can also use the Zig painty pen or a 14Kt. gold leafing pen to edge a plate or glass picture frame.
8.) Top it off: Tie ribbon, raffia or organdy around the top of a votive candle holder for a special look. Viola! You now have a beautifully etched project to give as a gift.
TOTAL PROJECT TIME: 30 minutes (or so)
Tips to Remember:
---------------------------
* If you're etching on a mirror, the reflected image may look fuzzy.
* Stencils designed for painting can be difficult to place on curved surfaces. I had better luck making my own with Contact paper and my stamps.
* Choose etching paste for items where you want a pattern on a clear background or on a flat object like a plate or bowl.
* Use etching solution (into which you dip your item) if you want your pattern to be clear on an etched background.
* Be careful: wear gloves, check warning labels, and work in a well-ventilated area.
* If your first attempt is less than perfect do not despair . . . try it again and you'll see how much improvement you make.
Registered: February 29, 2004 Location: O'Fallon, Missouri Posts: 361
Tue, Oct 12, 2004 @ 6:13 AM
Please share your secret! I would love to make these. Where did you get the jar? All of us stampers just love new techniques!!!!!!Thank you, thank you
Carla