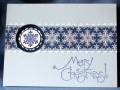
I used three different punches to make my card. The largest and smallest punch is by Marvy and the middle size is EK Success. It is about 1/16” larger then the other so it makes a nice border. The scallop is Fiskars decorative scissors.
I didnÂ’t have the strength to punch through all the layers so I punched as far as I could then backed it off. It was enough to make punctures in both layers which made it easy for me to line the back and punch then the front. It came out a perfect line up with this procedure.
The snowflake is stamped with navy ink and before moving the stamp I line the positioner up to it, clean the stamp and stamp again with VersaMark. Then use clear embossing powder and heat and quickly put fine glitter over the powder before it has a chance to cool. You must work fast! As a newbie and seeing stamping glitter I assumed it was embossing powderÂ…wrongÂ…this is one way of using it up and itÂ’s not a heavy glitter look.
I then glued the piece of cardstock to a second layer and punched it out. Glued it to the punched navy layer then to white and cut out with the scallop scissors and glued it to the navy which is described in the link.
Date: Tuesday, September 19, 2006 GMT Views: 4112
Favorited:40
Registered: April 20, 2006 Location: Michigan's Upper Peninsula Posts: 34762
Tue, Sep 19, 2006 @ 8:55 PM
Glad you made that announcement first -- I would have been making the wrong card (ha ha) -- this is great -- thanks for posting all the instructions -- it looks WONDERFUL!!!
Registered: April 5, 2005 Location: AZ Posts: 4489
Tue, Sep 19, 2006 @ 11:33 PM
I love this. That snowflake looks terrific and I really like the scalloped edge in your donut. That paper is so neat and the sentiment is perfect. Great card.
Registered: January 31, 2005 Location: Northern MN Posts: 5529
Wed, Sep 20, 2006 @ 4:51 AM
Beautiful card! I love the navy layer and scalloped edged white layer around the snowflake and the designer paper is wonderful too! Can't wait to give the "donut" card a try.