I saw the planner/organizer in the demo forum after convention and since I don't like the set they used, I came up with my own version.
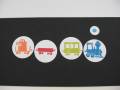
The open picture shows the index tabs. I chose to make them the full width of the paper because I think it makes them more sturdy... I was worried about the paper tearing if it gets used often.
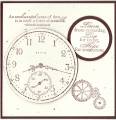
The Index Tab Template... I decided to create it for my customers to use when they are making theirs because I had a hard time getting the Word Window to punch in EXACTLY the right spot. I punch out a window, tacked it on the piece of chipboard, and traced it. Then I punched to make the template. When I use the template, I just trace the inside right where I want the window and then punch.
See the other two pics in my gallery to figure this one out. Sorry this is so long!!
Date: Monday, September 4, 2006 GMT Views: 744
Favorited:11
Registered: January 25, 2005 Location: Posts: 2482
Wed, Oct 04, 2006 @ 12:25 PM
Thanks for this information. I had saved your planner in my favs but didn't see the additions/instructions you gave on the tabs. I was wondering if you just put them at the end of the page or what. I saw Target had some comp notebooks that had some sort of divider in them (still the same price) but the dividers were just yellowed thin paper so that would tear just like regular paper. I'm making a bunch of these this weekend and am looking at examples on the site for inspiration. Glad I took the time (away from work!!!) to do this. thanks again (oh and by the way, I LOVED your planner - but you probably already new that since I saved it to favs!!). Mary