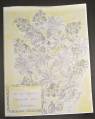
I finally attempted Inkerella's watercolor resist (and cased one of her layouts). My first two were complete disasters - didn't even mount them onto a card! This one wasn't a total loss! It was a lot of fun trying and experimenting with colors!
Date: Sunday, July 30, 2006 GMT Views: 788
Favorited:7
Paper: Mellow Moss, Night of Navy, Rose Red, Naturals White
Ink: Regal Rose Craft, Rose Red, Bashful Blue Craft, Brilliant Blue, Night of Navy, Mellow Moss Craft, Always Artichoke, Pale Plum Craft, Perfect Plum, Versamark
Accessories: Garden Green Marker, Color Spritzer Tool, Garden Green Reinker, Crystal Clear Embossing Powder, Heat Tool, Hodgepodge Hardware, Navy Wide Organdy Ribbon
Registered: November 26, 2004 Location: Green Mountains of Vermont Posts: 2925
Mon, Jul 31, 2006 @ 4:00 AM
This is no loss at all, it is stunning. Wonderful card. It is almost 7am EST and this is already on page 4 of the gallery for today. Don't be discouraged if you don't get many comments many people don't view everything esp on a Monday. It is a fantastic card.
Registered: January 26, 2005 Location: Austin, Texas USA Posts: 40
Mon, Jul 31, 2006 @ 6:04 AM
Here are the directions that Holly (AKA Inkerella) gave me:
1. Stamp the first image of a 2-step stamp set using 2 or 3 coordinating colors of ink. Craft ink will give a more opaque look (example-tulips), Dye ink gives a more clear look (example-lilacs)
2. Heat set the ink.
3. Stamp the same images in versamark slightly off center from the first set of colored images.
4. Emboss with clear embossing powder.
5. Using an aqua painter or paintbrush, wash the entire piece of cardstock with 2 colors of dye ink (I have the best luck with a green and a blue) and work the 2 colors until you get a watery look. Use lots of water.
6. Sandwich the piece between 3 sheets of copy paper (one on the bottom and 2 on the top) and with a hot iron press until all the embossing is removed (like the batik technique). You may need to move the copy paper around and replace it as necessary to remove all the embossing.
7. Stamp the line or second images in dye ink, again slightly off center of the other images and in a slightly darker shade.
8. Using the same colors that you did the watercolor wash, stamp a speckle background or spatter with a toothbrush and ink.