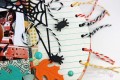
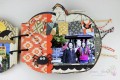
I can take no credit for this. I went to a class and learned how to make these. Sylvia DeJong Simpson is who the directions came from and I'm sorry but I don't know her SCS name.
I am totally hooked on these and you can make 2 out of one Simply Scrappin Kit
Date: Saturday, July 29, 2006 GMT Views: 1583
Favorited:64
Registered: April 29, 2004 Location: Midwest Posts: 991
Sat, Jul 29, 2006 @ 12:39 PM
I made one of these last fall...I did them as a stamp camp and got excellent reviews! Yours is awesome. I have only done them with the In Full Bloom Scrapkit and the Christmas one...now I am going to give the travel a one a try! It is gorgeous!
------------------------------ ~Theresa~ Addictedand lovingit!! Member #4235 Checkout myblog!
Registered: April 28, 2006 Location: Jefferson County Posts: 33083
Sun, Jul 30, 2006 @ 7:58 AM
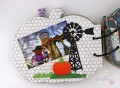
Cascading Album Step by Step Instruction Sheet
Supplies:
Simply Scrappin� Kit
Cutter/Scorer
Sticky Strip
Glue Stick
Mini-Glue Dots
8 medium envelopes to match Simply Scrappin� kit
Ribbon to coordinate with Simply Scrappin� kit � Optional
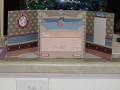
Instructions for Album Cover
1. Remove Scoring blade from cutter � set aside
2. Cut both 12x12 sheets of patterned paper into 6x12 strips (after cutting you will have 4 strips � 2 of each pattern)
3. Replace Cutting blade with scoring blade.
4. Score all 4 pieces at 5 �� and 6�
5. Determine which you want to be the outside of the cover and which you want to be the inside
6. Fold on the score lines and crease with the bone folder if needed. For the outside, the white side of paper should be facing in and for the inside the white side should be facing out.
7. Put down scrap paper. Using 2 of the matching patterned pieces, put glue stick all around the perimeter and in the middle of one of the white sides of the 6� square
8. Adhere the 6� squares together to form a 6�x18� strip � use bone folder to smooth (don�t skimp on glue)
9. Repeat with the two remaining matching 12� strips to form another 6�x18� strip
10. On the backside (white side) of one of the 6�x18� strips, apply the glue stick around the perimeter and in the interior. (I started on the middle 6� square and then worked to the outer 6� square with the glue stick)
11. Adhere the two 18� strips �back to back�, right sides out (one design on outside a different one on the inside) working square by square. Trim as necessary. This is the album cover and you can set aside.
Instructions for Inside Portion of Album
1. Using the 8 medium envelopes, tuck the flap ONE envelope inside itself, and using either the 1 �� or 13/8� punch, punch a � circle in the top of the envelope. Set aside. This will be the front of the eight envelopes.
2. Using the remaining seven envelopes , fold the flap BACKWARDS on all seven envelopes and crease with bone folder.
3. Stack all seven envelopes in a stack with the flaps to the back, lick the adhesive of the top envelope and adhere to the front of the next one, repeating this so that all seven envelopes are stuck together and there is one flap remaining at the back of the last (back) envelope
4. Place sticky strip above an below the adhesive on the back flap of the bottom (back) envelope and adhere the stack of 7 envelopes to the inside of the 6� square section (middle section) of the album cover, about 1� up from the bottom edge
5. Adhere the envelope with the half circl punch to the top of the stack using sticky strip on the back side of the envelope
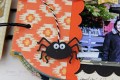
6. Decorate the front of the envelope with some of the die cuts
7. Replace the scoring blade with the cutting blade in your cutter. Cut both of the solid color 12�x12� pieces of card stock as follows:
a. Cut a 2 1/8� strip off one end. Save this in case you choose to do a card stock band to close your album
b. Cut the remaining sheets into four cards of 4 �� x 5 �� of each color (Total of 8 cards)
8. Place a die cut as a �pull tab� at the top of each card. To remove the stickiness from the exposed portion of the die cut, apply the embossing buddy to remove the stickiness. Place one card in each envelope and attach pictures, recipes, journaling, etc.
9. Decorate the remainder of the album with additional die cuts, stamps, etc.
10. Secure album with closure method of your choice (ribbon, card stock band, Velcro, etc)
Optional: Cardstock Embellished Band
1. Cut your 2 1/8� strip in half lengthwise so you have two 17/16� strips.
2. Score both strips at � inch
3. Use sticky strip to adhere the two strips to make one long 24� strip
4. Score one side of the 24� strip at 6 1/16� from the joint and then at 6 9/16� from the joint
5. Fold around album. Make adjustments so it fits around album but not too loosely as to fall off. Bring other end of the strip around, trim the appropriate length and attach with sticky strip
6. Tie a 36� grosgrain ribbon around tightly, adhere with glue dots and add other ribbons, tags, embellishments as wanted.
Sylvia De Jong-Simpson
Stampin� Up Demonstrator
Denver, CO