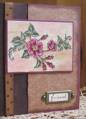
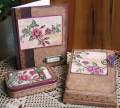
Part of a gift set. See other photos, also. This is my favorite part of the set. See the card description for info on aging the cardstock. The Toile image was watercolored and cut out very carefully, then painted on the back with Crystal Effects which stiffened the delicate image and served as the glue to hold it down. The sides of the tin are covered with ribbon adhered with Sticky Strip. This is a Cinnamon Altoid tin, so the lid is burgundy which was perfect for my color scheme. It smells yummy, too!
I had several false starts on this, trying to get the lid covered to my satisfaction, with the look I was aiming for. In the end, it was so simple I couldn't believe it: I covered the lid with tacky glue, being careful to spread a thin layer all the way out to the edges. I pressed it onto the cardstock and allowed time for the glue to set, then trimed off the excess cardstock with my paper snips. I then sanded the edges of the cardstock, sort of beveled the edges, so that it made a seamless transition from the cardstock to the edge of the lid. I antiqued the cardstock after it was adhered to the lid. You absolutely cannot tell that there's a layer of cardstock under that main center image that I layered over top, no matter how closely you look or how carefully you feel it. I wasn't worrying about marring the finish on the lid (although I wound up with only one tiny scrape) because I was aging it, anyway. This would also work for a shabby look.
Maybe you've already thought of this sanding idea but, if not, I hope this helps and you'll give it a try. It's way quicker and easier than it sounds in this description! Thanks for looking!
Date: Tuesday, July 11, 2006 GMT Views: 3157
Favorited:207
Registered: March 8, 2004 Location: Decatur, IL Posts: 213
Tue, Jul 11, 2006 @ 10:09 PM
This, and the other projects, are simply gorgeous. I am going to miss this set something terrible, but the customer who bought it at a discount is very happy. Maybe I could borrow it from her.....
Registered: June 19, 2003 Location: Super Bowl City, TX Posts: 34508
Tue, Jul 11, 2006 @ 10:53 PM
What an amazing project!!! No wait, beyond amazing!!! I have discovered that keeping a sanding block right by my crafting area is essential. Smoothes edges from not so great cutter blades and great for distressing too!!! THANKS for all the great info that you provided!!!
------------------------------
Jackie G. (aka Jacquita) SCSmember #656
Write your sorrows in sand and your blessings in stone.
Registered: February 11, 2006 Location: CA Posts: 94
Wed, Jul 12, 2006 @ 1:23 AM
absolutely beautiful....the cutting alone must have taken you a long time...but the outcome is worth it!!! i use the sanding on my tins and i agree...it is so much easier!!!
------------------------------ Kim
And what does the Lord require of you? To act justly, to love mercy and to walk humbly with your God (Micah 6:8b)