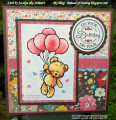
I made this card for my niece for her birthday. This is also my card for the SCS Ways to Use It WT993 of Balloons from March this year. Please see this link for the details on the Challenge ---> WT993 - Balloons - March 21, 2024 by PeonySnail at Splitcoaststampers There are no time limits to play SCS Challenges so why not play along & have some fun :-)
The main image is by Penny Black - Balloon Ride. I stamped it onto watercolour paper using Versafine Onyx Black ink and coloured it with a mix of different pencils: Lyra Watercolours, Faber-Castell Albrecht-Durer Watercolours and Derwent Inktense using a #2 round paintbrush. I added some white highlights on the balloons using a White Gel Pen then added Wink of Stella Clear Glitter Brush which you can't really tell in the photo but it made them look more translucent. I went over the black lines with a Copic .01 Black Multiliner to darken them up. I added some Kindyglitz Crystalina Glitter glue to the bear's cheeks. I coloured some white glitter cardstock using Distress Inks to match the colours of the designer papers and punched them using a very old but very loved punch: Carl CP-8 Heart Duo and glued them around the image using Tombow Mono Aqua glue. The panel and designer paper layers were diecut using Lifestyle Nesting Card Templates and my Big Shot. The sentiment is from an old Lili of the Valley UK unmounted rubber set called Circular Sentiments - For You. I coloured the wee flowers on the sentiment with my watercolour pencils and added some glitter to them. I used Lifestyle Nesting Circle and Nesting Scallop Circle dies to diecut the sentiment panel. The designer papers are by My Mind's Eye - Collectable - Unforgettable and are really old - from 2013 so LONG retired.
The centre panel was punched using an EK Success Scalloped Scallop border punch. I kept thinking I needed to add something else to my card and pulled out flowers, ribbons, twine, buttons, charms, rhinestones and pearls - but just couldn't get anything to look right and in the end, I gave up and left it as it was because I had literally spent hours fiddling and needed to get it in the mail. Honestly it took longer fiddling than it took to make the rest of the card which came together quickly. So frustrating! Once I had finished my card front, I glued it to an Anko White Card Base using Tombow Mono Multi glue.
Finished size is 6" x 6" or 150mm x 150mm.
Thanks for having a peek at my card! You are welcome to visit my blog: Instead of Ironing Blogspot - this link will take you to my blog post ---> https://instead-of-ironing.blogspot....hday-card
Date: Wednesday, May 1, 2024 GMT Views: 992
Favorited:1
Registered: January 20, 2010 Location: Brampton, Ontario Posts: 26216
Wed, May 01, 2024 @ 3:53 AM
Your sweet bear is so beautifully coloured! Love the highlights on the balloons. Great use of the patterned papers. I have loads of DP and seem to have gotten away from using it. This is a lovely example of why I need to get it out again. Super card!