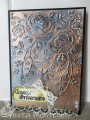
This started last week when I've been making some shaving cream backgrounds, this one was so ugly, so I've dry embossed it and used a black marker to try to do the TLC with the black marker and embossing folder, but this didn't save my background, so covered it totally with the black sharpie, then added a layer of white acrylic paint, and the wax and mousse once dry i've sponged with stazon jet black and a black wax crayon, stamped the sentiment and heat embossed with black embossing powder, torn the edge and added lace, did the same with the bottom of my background, added a lace bow and some pearls and layered on black base
TFL
Date: Friday, May 12, 2023 GMT Views: 222
Favorited:0
Splitcoast Dirty Dozen Alumni SCS Gallery Moderator Splitcoast Challenge Hostess Teapot Tuesday TEAm
Registered: July 27, 2007 Location: Dublin, Ireland Posts: 132007
Fri, May 12, 2023 @ 2:18 PM
Well, all the things you had to do to rescue your background ended with a fabulous result. It reminds me a bit of the tarnished impressions tutorial. Great vintage look.
Registered: June 4, 2009 Location: Deatsville, Alabama Posts: 83888
Sat, May 13, 2023 @ 5:56 PM
So glad you kept trying until you got here, Anita. I think it is beautiful and so cool! Lovely anniversary card. Hugz
------------------------------ Nancy Williams - Hope your day is Spirit-filled and ink-filled (in that order)!DRS Designs-DT, Punchkateerforever, Dirty Dozen Alumni