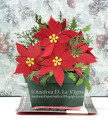
I began by creating my card base & flower pot, as per the instructions in the tutorial. I did that first, so I could have a sense of how large each flower could be & how many I would need. I used a plaid patterned paper for my base, since it made me think of a holiday tablecloth. I found a dark green cardstock in my scrap stash for the pot itself.
I die cut a total of 8 poinsettias. I used Cherry Splash for the top 2 layers, and Caramel Apple for backing leaves on the flowers. I also found a super bright yellow-green cardstock in my scrap stash that I used for the flower centers.
I glued the layers of my flowers together, & after the glue set up, added the flower centers. I used glue dots to adhere the flowers themselves to the acetate support pieces I'd added to the pot. For the greenery filler pieces, I just kind of stuck each one into the arrangement & added a bit of glue to each to stick them to the flowers. It was enough glue to hold everything in place, while still keeping the whole arrangement full & "fluffy."
I heat embossed the greeting in gold, then die cut it with a sentiment strips die. The die was a bit too long, so I had to do partial die cutting to shorten it. I added that to the card base with foam adhesive squares, leaving a space with no adhesive for the belly band to fit under the right end.
Date: Friday, September 30, 2022 GMT Views: 318
Favorited:2
Paper: Bazzill Cherry Splash & Caramel Apple cardstocks; Recollections "Christmas Plaids" 6x6" patterned paper pad; red, green, cream, yellow-green
Paper Size: A6
Ink: Versamark
Accessories: Poppystamps "Blooming Poinsettia" & Tim Holtz "Mini Holiday Greens" die sets; My Favorite Things "Essential Stitched Sentiment Strips" die; Ranger Gold Super Fine Detail embossing powder