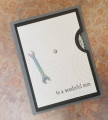
This is the inside mechanism of the whirling/spinning card I made for a challenge that required a masculine theme. Since tools are often a "guy thing" (but I love them, too) I chose a wrench circling a square "nut" I created by silver heat embossing a square brad that was brass colored.
I had just gotten the Stampin' Up! (SU) "Give It A Whirl" die set that creates spinner wheel interactive cards, so was really looking forward to trying it.
I watched a couple videos on how to assemble the card, one of which is by Cindi-Lynn Taylor (I decided that I didn't want to use the dies to create a window, but instead I wanted a tool to spin around the center.) If you are like me and use magnets to hold down your paper/cardstock in your stamp positioner, you've no doubt accidently allowed two to smash together and fracture once or twice. I had saved these tiny fragments thinking some day they would be useful... well, that day has arrived! On an adjacent posting you will see the card front. Note that one of those fragments has been attached to the spinning wheel using super strong Scor-Tape. So when the wheel is spun, the magnet rotates around the center. After assembling the card with that fragment inside, I simply cut a very thin strip off a sheet of magnetic heater vent cover and used Scor-Tape to attach it to the back of the wrench. So the magnetized wrench follows the magnet fragment as it moves.
Date: Wednesday, May 25, 2022 GMT Views: 228
Favorited:2
Stamps: SU Happy Birthday Everyone, Lawn Fawn Push Here
Paper: SU Basic Gray, Basic Black, Smoky Slate, SU Sweet Pea DSP, Recollections Silver Foil Cardstock
Paper Size: A2
Ink: Memento Tuxedo Black, Versamark
Accessories: SU Give It A Whirl Dies, Brother ScanNCut CM350, Bearly Art Glue, Recollections Square Brad, Silver Embossing Powder, Heat Tool, Score Tape, Magnet Fragments, Magnetic Sheet
Techniques: Spinner Wheel Card, Die Cutting, Digital Cutting, Heat Embossing,