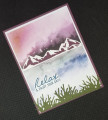
This card was made for a card challenge that has an "Everything Goes" theme, but also encourages us to also repeat images/stamps as well as use shades of the colors blue, green and purple.
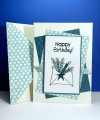
When I saw the color part of the challenge, I right away thought of the gorgeous recently retired Stampin' Up! (SU) "New Horizons" designer series paper (DSP) with all its beautiful swashes of colors. One of the designs has just the right color combo, except for a hint of yellow. So I got out my SU Rich Razzleberry ink pad and blending brush to cover over the yellow area (it's in the upper left of my card).
Now I had the perfect piece of pattern paper to begin my scene building! The suite stamp and die set were my way of adding details I needed. Since the challenge required repeating elements I chose to use to create two mountain strips and overlap them by reversing one of the mountain die cuts and attaching it with foam tape for dimension. Typically, when you die cut paper the back of the cut has "ridges" around the edges. I remedied this by running one of my mountains through my Sizzix Shot a second time between pieces of plain white copy paper to flatten those edges. It worked really well! I attached these mountains right at the "waterline" of the pattern design. The second repeating element is the die cut "grass" in the foreground. I cut three of these grassy pieces, then to give them some texture, ran them back through the Big Shot again, but this time with the "front side" down against the cutting plate which had lots of "scars" on it from all the die cutting I had done in the past. I put eight layers of copy paper on top of the grass as a shim to really press the green paper into the scars on the plate. This resulted in a nice rough texture with some lines in it for realism. Note that of the three grass cuts was reversed to avoid exact repeat of the grass pattern.
Finally, I stamped the sentiment on white cardstock using SU Not Quite Navy ink, then used my Brother ScanNCut digital cutting machine to scan the words, then add a 0.04" border around them before then cutting them out. I cut two more "blank" sentiment outlines to glue stacked behind the stamped sentiment to give it added depth and dimension. For those of you who may have a digital cutting machine that also scans like the Brother CM350 that I used, you will need to make light pencil marks between the letters so that the machine will see one single sentiment rather than individual letters. These are easily erased after you have cut out the sentiment. This trick is really useful not only for sentiments, but for any image you want to cut out if there are gaps in the linework/drawing outline.
I am rating the difficulty level of this card as a "3" out of a possible "5" because of the extra steps I took to create repeat elements and to stick to the color scheme. I think it will make a nice card for one of my special chemotherapy buddies to whom I send a card of encouragement each week. If you are interested in being a "chemo buddy", I encourage you to sign up at https://www.chemoangels.com/
Date: Thursday, April 21, 2022 GMT Views: 910
Favorited:6
Additional Info
Stamps: SU On the Horizon
Paper: SU Fresh Fig, Mossy Meadow, Basic White, SU New Horizons DSP