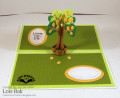
This card was made for a really cool challenge whose theme is "magic/fantasy". I knew right away that I wanted to use the Stampin' Up! (SU) "Magical Day" stamps with its wizard, mermaid, dragon, and unicorn for this card!
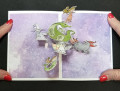
I just recently bought the fantastic Karen Burniston pop-up die set called "Photo Collage Pop-Up" die set. It is designed to have an explosion of mini "Polaroid" photos happen when you open up the card. For my first time using this creative die, I chose to use magical elements instead of photos. The die is designed to allow you to have six to eight photos be displayed inside your card.
I started by stamping all the magical creatures included with the stamp set: unicorn, mermaid, dragon, wizard, and knight. But that was only five and I needed six... so I remembered a trick I'd used some time ago of die cutting both the knight and the mermaid and combining them to create a lady sorceress. Viola... a sixth magical creature!!!
After stamping all the images, I colored them with tons of Copic markers (too many to list) and used the stamp set's matching dies ("Magical Mates") to die cut each out. For the front of the card I die cut an extra three wizard shapes to glue behind the colored image to make him have more dimension and presence.
I die cut the magical stars flung from the wizard's hand using SU "Stitched Stars" die set from SU Lovely Lipstick Foil Sheets. It was one long die, so I cut it so I could create more of a rounded cloud surrounding his head.
I tried to think of a way to make the word "Magical" on the front appear more special, so I used two different SU inks to kind of create an ombre effect by multiple stamping with two different shades of pink. I then die cut the word out with the banner from the same die set at the magical creatures. I used Wink of Stella to coat the entire banner to add subtle shimmer.
You'll note that the sentiment "Hope Your Day Is" is not aligned with the "Magical" part of the sentiment. I had to do something that is REALLY hard, but sometimes the only solution for a stamper... I cut a single stamp into two parts! I've not idea why the sentiment stamp and it's matching banner die aren't sized so you can stamp both lines and they fit on the banner,,, but they don't. May the "stamp gods" forgive me! :-) To create the pink foil mat behind the banner, I then used paper snips and cut all four sides of the banner down a bit so that the foil could show slightly around the edges.
Now for the inside... I am going to refer you to Karen Burniston's wonderful web site (https://karenburniston.com/photo-collage-pop-up/ ) with all her creative pop-up dies for the instructional video on how to create this pop-up card. I will say that I used 0.01" thick clear acetate instead of cardstock to create the mechanism since my magical elements were odd sized and relatively small so they wouldn't hide the pop-up gadget when opened. I wanted it to appear as if all these magical creatures had exploded out from the center of the card without a lot of "stuff" in the background. You will want to watch her video at least twice before attempting the card, and may need to refer to it a couple times as you glue/tape the pop-up mechanism together just to make sure you do it right. You will need to test each element after you add it before going on to attach the next element to ensure everything flows smoothly without snagging when the card is opened and closed.
I used 110 lb thick white card stock for my base, and didn't feel I had to reinforce the back like she mentioned you might need to do. The resulting card is super fun to play with and will delight whomever you give it to. Note that it is very bulky, so will require extra postage. It folds flat, just is kinda thick for regular postage.
I am rating the difficulty level of this card as a "5" out of a possible "5". This might be the only card I've ever shared with you that I've rated this difficult. If you follow her video (she has at least 3 versions) it works just exactly like she demonstrates and gives detailed instructions for... but you must be precise and do testing with each new pop-up element you add. I estimate it took me two hours to build the inside of the card. I thought it was fun and will definitely make more in the future!!!
The front of the card is shown in an adjacent post with the same name.
Date: Friday, March 18, 2022 GMT Views: 368
Favorited:2
Paper: SU Basic White Thick, SU Grapefruit Grove Foil Sheet, SU Lovely Lipstick Foil Sheet, CraftSmart Star Seekers Paper Pad
Paper Size: A2
Ink: Memento Tuxedo Black, Copic Markers
Accessories: SU Magical Mates Dies, Karen Burniston Photo Collage Pop-Up Dies #1098, SU Stitched Stars Dies, Paper Snips, Tombow Multi Liquid Glue, Scor-Tape, Paper Accents 0.1" Acetate Sheets