This card was made for a sketch challenge that had the optional theme "animals". I thought I'd add an extra challenge for a fancy fold card made with pattern papers (I have a large collection of paper, but for some reason rarely use them on my cards!).
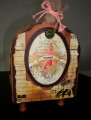
I had found the Fancy Flap Fold tutorial by Debbie Henderson ( https://www.debbiehendersondesigns.c...lap-card-fold/ ) about a year ago, and thought the triangle front would be perfect for the sketch challenge. I won't repeat Debbie's tutorial instructions except to add that when cutting the triangle front from the fold line on the wider panel to a point about 2" from the fold on both the top and bottom of the panel. You can make it closer to the fold line, but that reduces the area you will have to cut your circle opening.
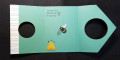
For my card, I used the Stampin' Up! (SU) "Stitched Shapes" circle dies that were sized 2-3/8" and 1-7/8" in diameter.
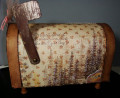
For my pattern paper I used floral sheet from two different retired SU Designer Series Papers (see below). I chose them because of their very distinctively different background colors to allow the fancy fold elements to really show. The card base is SU Just Jade. A note on the base... when you cut it and score you will have one panel that is wider than the other. When you go to cut your pattern paper for the smaller flap you will be cutting a panel that is 3-7/8"x 5-1/2". Don't be surprised that the pattern paper will extend about 7/8" beyond the flap of the card base when you glue it on. Plan ahead about where you put the glue on the pattern paper so you don't have a gluey back sticking over the edge of the base, and that the pattern on the back of your pattern piece is compatible with your overall card theme.
I created the 3D bee using the retired SU "Dragonfly Dreams" bee stamp with Versafine Onyx Black ink since it's a good ink for detailed images. I then used paper snips to fussy cut out the bee's body and remove the cardstock wings. I then used black Stazon ink to stamp the bee again on clear acetate. I fussy cut the wings on the acetate leaving a "bridge" across the wings to connect them. I used this bridge to glue the wings underneath the body. The result is a bee with transparent wings. When I mounted the bee, I used foam tape to allow the wings to be above the card base for added dimension.
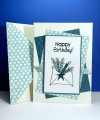
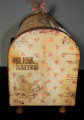
On the inside of the card, where the bee is attached, I stamped the sentiment "You and me... Friends we will always be" using Memento Tuxedo Black ink. At the bottom of the inside I stamped a beehive from the SU "Bees N' Blossoms" retired stamp set using Versafine black ink, then stamped the beehive again onto SU Hello Honey cardstock using SU Sahara Sand ink. I then fussy cut just the beehive with paper snips. I put a circle of foam tape behind the hive and gently pressed the hive around the edges to give it a 3D look before attaching it exactly over the black hive.
I am rating the difficulty level of this card as a "3" out of a possible "5" because of the need for accurate measuring, the number of steps required, and the fact I fussy cut the bee and hive. I know the friend who I made this card for will really love it!
Date: Tuesday, February 8, 2022 GMT Views: 170
Favorited:2