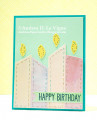
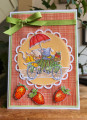
My counselor's birthday is this month. Her late mother used to quilt, so when I saw this tutorial, I knew I had to use it to make a birthday card for her!
I altered the design a bit. Rather than using adhesive sheets & having the strips the height of the card, I cut my paper strips individually from the "Watercolor" patterned paper, and angled one end of each. I adhered them on a panel of cardstock, staggering the heights, then trimmed off the excess hanging over the bottom edge. I initially planned to machine stitch each candle, so I added adhesive just to the middle of each to keep from gumming up my needle. That ended up not working out, though. Thankfully, I discovered it wouldn't work before I got very far into the stitching!
I still wanted real stitching, though, so I decided for a hand-quilted look, rather than machine. The gold standard for hand quilting is 10 stitches per inch. I decided to make mine 8 per inch, though. This made measuring much easier, & made it less likely I would tear the paper by having my holes too close to each other. I used my gridded ruler to measure, & poked all the holes with my paper piercer. I did a simple running stitch, again to mimic hand quilting. I used gold holographic thread, just to give more pizzazz.
I used a die from the "Garden Greens" set for my flames. That particular die has 3 leaves that are roughly the right size & shape to represent flames. I die cut them from yellow shimmer cardstock from my scrap stash. I trimmed each leaf off the branch, glued them in place on my card, & marked where to poke the holes. Then I stitched them the same as the candles.
I stamped the greeting on a scrap of the same "Watercolor" paper, cut it into a banner, & glued it to my card panel. Finally, I matted the panel with teal, & adhered that to a white card base.
Date: Friday, November 5, 2021 GMT Views: 336
Favorited:3