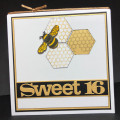
Very top layer is white CS; punched a hexagon in the front's white panel in the upper right quadrant (keep the punched out piece and punch one more hexagon from scrap white CS). Use a black copic marker to color the edges of both positive and negative hexagons.
Stamp the honeycomb in gold ink on the two positive hexagons.
Second cardfront layer (from top down) is gold CS. Ink honeycomb stamp with Smokey Gray and stamp-off once then stamp the gold CS where it will show through the white CS's negative-punched hexagon (top right quadrant).
The bumblebee is a 2-step stamp; stamp solid stamp in yellow and 2nd detailed stamp in black; fussy cut the bee.
Cut strip of black CS slightly taller than tallest letter of sentiment for the front; adhere black strip to slightly larger gold strip. Die cut all letters & numbers from gold CS then adhere to black CS strip.
Final assembly (from card body up to topmost cardfront layer): Cardbody 5" square, black CS square; gold CS square (that had honeycomb stamped towards upper right quadrant); white CS square with negative hexagon oriented over stamped honeycomb.
Adhere Sentiment strip to card front.
Adhere two positive punched hexagons to white CS, adjacent to white CS's negative hexagon.
Add dimensionals to rear of bumblebee and add to cardfront.
Tied gold rattail to top of card.
TIP to keep twine/cord in place: cut a tiny notch at both ends of cardbody's fold; this notch will keep the cord from sliding out of place.
Date: Monday, October 4, 2021 GMT Views: 258
Favorited:5
Stamps: Stampers Anonymous Honeycomb; Stampin Up Dragonfly Dreams
Paper: Ultra Smooth White; Gold; Black
Paper Size: Finished Card 5" square
Ink: Delicata Golden Glitz; Versafine Onyx Black; Stampin Up Summer Sun; Versafine Smokey Gray
Accessories: Misti; Big Shot; scissors; Alpha & Numeric Dies from my die stash; adhesive; Stampin Up Hexagon punch; dimensionals; Black Copic Marker (to around the edges of white CS's edges); gold rattail cord.