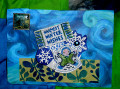
This card was made for my husband's birthday and as an entry to a card challenge that was a sketch and an optional "Outdoor Fun" challenge.
I had seen a great series "layered window cards" by Jennifer McGuire, and decided it would be a technique that would work well for an outdoor layered card. Her tutorial can be found at: https://www.jennifermcguireink.com/2...giveaways.html
I don't have any fancy window dies, but I do have stitched rectangle dies. So chose to create this A2 (4-1/4"x 5-1/2") card with multiple layers embellished with die cuts from a Stampin' Up! (SU) stamp/die bundle called "Always An Adventure".
The card folds like an accordion. You can build it all with a single color, or like I did with graduating shades of green cardstock, each with a slightly smaller rectangular window than the one above it. Jennifer's tutorial gives the dimensions in her video, but to make it easier for you, I'm giving you the dimensions here:
- Three pieces of cardstock measuring 4-3/4"x 5-1/2"
(yes, half an inch winder than a standard A2 card because you need a scored hinge on the top 3 layers). Score each of these three along the long side 4-1/4" from the other side. Use a bone folder to make these folds nice and crisp.
- One piece that will be the back of your card (fourth layer, typically the darkest color) cut at the standard A2 size - 4-1/4"x 5-1/2".
I used rectangular dies starting with the largest die for the front, and a cascading size smaller for each layer as you go down through your colors. Die cut the front piece, then place the next color under it and tape down your die centered in the opening of the piece above. Do this for all three layers.
Some tricks I learned from watching Jennifer's video several times are:
- As you work with the layers, ALWAYS have your bent fold facing toward the back of the card as you assemble the card.
- The second and third layer layers need just a smidgen trimmed off the long side opposite the folded edge (less than 1/8") to allow the layers to fold together in accordion fashion without buckling. Once your card is assembled, you'll likely also have to trim a smidgen off the back to keep your edges aligned.
- When assembling, the glue goes on the "inside" of the folds (hinges), and again always have your folds facing toward the back of the card.
Be creative when designing the different layers of the card. I stamped and die cut the tent that is glued to the second layer of the card using the same dark green as I used on the back layer, but stamped it on cardstock from the front layer. This allows your card to repeat color themes. I also added texture to the tent by running it through my Big Shot inside the SU "Subtle" embossing folder to give the tent texture. I also repeat stamped the side of the tent to get a darker color green to give it more of a 3D effect. I also glued a stack of two blank diecuts to the back of the tent before gluing it down, and to hide to stiffen it I added a third diecut on the backside of the card layer.
The third layer of the card was a tree "skyline" that went from one side of the medium dark layer spanning the opening. I used the same color cardstock for the layer as the diecut.
The back of the card holds the most detail (as a prize for flipping through all the accordion layers :-) Her I used diecuts from the matching die set. These included a mountain range die cut from SU Kraft cardstock, and capped with snow die cut from white cardstock. I stamped, die cut, and textured another tent just like the one I had glued to the second layer of the card, and glued it onto the back inside of the card aligning it exactly under the second layer tent. I stamped and die cut a lake using SU Marina Mist ink and glued it inside the card below the tent.
There is plenty of room below each die cut window if you wanted to stamp a sentiment on the card layers of your card. I plant to write my personal note on the back of the card.
Since I had to create an embellished window for each layer of my card, I am rating the difficulty of this card as a "3" out of a possible "5". No step is particularly hard, but it does take some planning ahead and time to assemble. I know my husband will love this card!
Date: Wednesday, June 16, 2021 GMT Views: 545
Favorited:3
Stamps: SU Always An Adventure, Approaching Perfection
Paper: SU Tranquil Tide, Just Jade, Mint Macaron, Soft Seafoam, Basic White, Kraft, Unbranded Aqua Vellum,
Paper Size: A2
Ink: SU Tranquil Tide, Staz-On JetBlack, Copic Marker B13
Accessories: SU Subtle Embossing Folder, Rectangle Stitched Framelits Dies, Outdoor Adventure Framelits Dies, My Mind's Eye Enamel Dots, Tombow Multi Liquid Glue, Mini Glue Dots, Paper Trimmer, Paper Scoring Tool, Gelly Roll White Pen