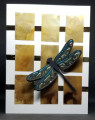
The sketch was for 9 rectangles covering the front of the card, but since the JAI Design Team encouraged us to get creative, I created the background by first dropping alcohol inks on the Yupo plastic paper, then using a soda straw to blow the ink around to creating interesting patterns. The inks I used were gold and butterscotch. I let this ink dry completely, then used a paper trimmer to cut the sheet into 9 rectangles measuring 1"x 1-3/8" each. It felt as though the rectangles needed "grounding", so I cut three strips of gold cardstock 1/4" wide and glued them equidistant across the front of the card, then using a stenciling brush I applied glue to each square and placed it center on the gold strips. The gold rectangles are so shimmery!
I wanted something to REALLY contrast with the gold background, so used the Stampin' Up! (SU) "Detailed Butterfly" dies to cut an outline (with lots of hole cutouts in the wings) and one butterfly solid outline.
The next step to create my "die inlay" pieces was to fold a sheet of unscented dryer sheet twice, then lay a piece of foil colored cardstock and run it through my embossing machine. The dryer sheet is REALLY important because it holds all the little inlay pieces on the sheet so you can easily choose which piece you want to use. I die cut three times, once on gold, once on green, and once on aqua foil cardstock.
The next step was to glue the a "holey" outline on top of the solid outline of the dragonfly. This gave as solid backing to the "holey" shapes that I could glue each tiny piece onto. I used a Silhouette "Pick-Me-Up" tool to select the color shape I wanted in the design and gently dipped the back of the piece into a little puddle of glue I had squeezed onto my craft working surface. Then carefully placed the foiled piece into it's matching hole to create the inlay design.
I then slightly bent my dragonfly wings up, and attached a narrow piece of adhesive foam tape to the back of the thick part of the dragonfly, and rolled up "logs" of Mini Glue Dots onto the back of the narrow part of the body. This then was applied to the card front.
I think the gold rectangles provide for a wonderful contrasting background, and their shimmer as well as the inlay pieces' sparkle really make the card an eye-catcher!
I am rating the difficulty of this card as a "3" out of a possible "5". It takes precision to line up all the gold rectangles, and lots of patience and planning to create the color inlay for the dragonfly.
Date: Monday, March 1, 2021 GMT Views: 518
Favorited:3
Paper: SU Whisper White Basic Black, Yupo Translucent Sheet, SU Noble Peacock Foil Sheets, Recollections Gold Foil Cardstock
Paper Size: A2
Ink: Ranger Alcohol Inks
Accessories: Soda Straw, SU Detailed Butterfly Die, Tombow Multi Liquid Glue, Unscented Dry Sheets, Silhouette Pick Me Up Tool, Mini Glue Dots, Stencil Brush